This is the abridged developer documentation for Diploi Docs
# Introduction
> Diploi is a platform and workflow to boost development team's efficiency
## What is Diploi? Diploi is a platform and workflow for developing and hosting your full application supporting popular frameworks and databases. Use Diploi for * Developing, testing and hosting just about any kind of web application * Quick prototyping of new products * Trying out new technology stacks with close to zero setup time If you started your project on a vibe-coding platform and need better team support, version support and possibility to code using Cursor etc. Diploi could be what you are looking for. ## Key Features * Launch consistent staging, development and production deployments with only a few clicks * Develop without installing or keeping anything locally. * Onboard new team members in only a few clicks * Supports a wide range of projects - from a simple website to a complex service with databases and microservices ### Supported Frameworks and Databases Diploi supports a wide (and growing) range of frameworks and databases, including: #### Components available  **n8n** new  **Laravel** new  **FastAPI** new  **Flask** new  **Deno** new  **Supabase** new  **Next.js**  **Node.js**  **Bun**  **React + Vite**  **Astro**  **SvelteKit**  **Nue**  **Ghost**  **Hono**  **Lovable**  **Django** beta #### Add-ons available  **PostgreSQL**  **Redis**  **MongoDB**  **MariaDB**  **MinIO** *** ## Prerequisites The only thing you need to use Diploi is a **GitHub account** and a **Web Browser**. Many prefer to use their locally-installed VSCode or Cursor IDE instead of the browser-based IDE. In that case you need to add your SSH key to Diploi in order for remote access to work. ## How it Works Diploi uses a configuration-in-code approach to spin up every deployment as a separate single-node Kubernetes cluster (Don’t worry, you need zero Kubernetes knowledge to use Diploi). Diploi takes care of hostnames, SSL certificates, building and updating Docker images for each service and making it easy to code right on the cluster, aiming for the best possible DX. Diploi works best when you set up your project as a monorepo, where the code for every component lives in a separate folder. If you are interested in more details and reasons for these choices, please see [Technical Deep Dive](/reference/technical-deep-dive/) ## Get started The easiest way to learn Diploi is by launching a new application. For a quick walkthrough [Get Started](/get-started/) here, no registration needed.
# Git Authentication
> How to interact with Git on Diploi.
Development environments on Diploi are remote (run on a specified Core, not your local machine), and thus do not inherit your local Git configuration. You have most likely done this first-time setup with Git in the past, but for those who havent, or those who want a refresher, we have collected information about these steps below. Firstly, Git requires you to input your username and email which will be included with every commit you make. Diploi can do this automatically for you, but you can also opt-out and fill in the information yourself. You can read more about this step [here](https://git-scm.com/book/en/v2/Getting-Started-First-Time-Git-Setup#_your_identity). Secondly, Git requires you to authenticate with the remote repository you are trying to interact with. Usually this is done via SSH keys, and it can certainly be done this way while developing remotely too, it just might not be the most secure solution. Diploi can automate this step too via a repository-specific access token. This token is scoped to a single GitHub repository, and will not grant access to an entire organization or user. You can choose opt-out of this automation, but you will have to supply an authentication method yourself. You can read more about authenticating with GitHub [here](https://docs.github.com/en/authentication/keeping-your-account-and-data-secure/about-authentication-to-github#https). ## Assigning a User to a Deployment This is the easiest way to handle Git configuration, as it will be handled automatically by Diploi. Diploi will use your GitHub email & username to sign commits with, and authenticate using a repository-scoped access token with limited access rights. ### Check if a deployment has a user assigned to it 1. Select an existing, or start creating a new deployment 2. Scroll down to the “Git” section 3. If the assigned user card is showing “Empty”, no user is assigned to the deployment. Otherwise, the user shown is the one assigned to the deployment. ### Assign yourself to a deployment 1. Select an existing, or start creating a new deployment 2. Scroll down to the “Git” section 3. Click “Assign self” ### Remove an assigned user from a deployment 1. Select an existing deployment 2. Scroll down to the “Git” section 3. Click the “trash” icon on the assigned user card ## Manual Authentication When the Git “assigned user” field is left empty on a deployment, no automated Git configuration or authentication will happen. This means that you will have to do the first-time setup with Git yourself, and provide a way to authenticate. We have collected the best ways this can be achieved below, altough letting Diploi handle it is recommended. Caution Remember, that any user with SSH access to a deployment will be able to use Git and read files on that deployment. Creating SSH keys or credentials on deployment is thus not recommended. ### GitHub Personal Access Token (PAT) * [Creating a PAT](https://docs.github.com/en/authentication/keeping-your-account-and-data-secure/creating-a-personal-access-token) * [Using a PAT to authenticate with Git](https://docs.github.com/en/authentication/keeping-your-account-and-data-secure/creating-a-personal-access-token#using-a-token-on-the-command-line) Danger As PATs are not scopeable to a specific repository, they will be able to access any repository the user that created them has access to. If you allow multiple users SSH access to a deployment, they will all be able to read the PAT, and access everything it has access to. ### SSH Agent Forwarding * [Using SSH agent forwarding](https://docs.github.com/en/developers/overview/using-ssh-agent-forwarding) Danger If two or more people are connected to a single deployment at the same time, they will be able to highjack each others SSH agents. This will allow them to use any SSH keys saved to the agent without the original SSH-connected users permisson. Read more of this attack [here](https://attack.mitre.org/techniques/T1563/001/). ### GitHub Deploy Key * [Creating & using deploy keys](https://docs.github.com/en/developers/overview/managing-deploy-keys#deploy-keys)
# Launching an existing application
> How to set up an existing application on Diploi.
## Ways to start using Diploi You have two ways to get started * [**Quick launch**](#quick-launch) if you want only want to test drive Diploi and don’t want to create an account just yet, or * [**Dashboard launch**](#dashboard-launch) available when you create an account and gives you access to all features available in Diploi Caution **Quick Launch** projects are **not intended for production**, as your code will only exist on the deployment launched, and changes will not be persisted to other deployments you launch within the project. #### Prerequisites * A GitHub account * Text Editor - We recommend [VSCode](https://code.visualstudio.com/) * An SSH Key (for development) - See [Add an SSH Key](/building/add-ssh-key/)
# Roadmap
> What's coming.
# Roadmap Here is a list (without priorities) of things that is coming to Diploi in the future. Some smaller and some bigger. Our internal list is much bigger, so this is just some highlights. ### Custom Templates We want to open up the possibility for users to create their own templates, opening up the full potential of Kubernetes in order to create the most complex environments. There are many challenges for us before we can enable this but it has been in our roadmap since day one. ### Instant Cloning We are working on a better storage layer that will make e.g. cloning instant and also enable a chunk of new features. Stay tuned. ### Self-hosted Cores This is something we eventually would want to support, before this we would also like to open source our core. Since we currently are pretty low on resources there is no good time estimate for this but stay tuned. ### Region selection Currently all our cores run from Ireland. Pretty soon we will add more regions so that you can get a core running closer to where you develop.
# Astro Template
> Under construction.
**Astro** is a web framework for building content-driven websites like blogs, marketing, and e-commerce. Astro is best-known for pioneering a new frontend architecture to reduce JavaScript overhead and complexity compared to other frameworks. If you need a website that loads fast and has great SEO, then Astro is for you.  SSR support with the Node.js adapter is preconfigured.
# Custom Templates
> Under construction.
Technically Diploi can run any application stack that can be hosted on kubernetes (so, practically anything). We want to give this power to anyone using Diploi, and are working on this but we cannot promise any release date just yet. **Missing your favourite stack?**\ Write us a message at , we’d love to hear what you think is missing. **Need a Custom Template right now?**\ Please contact us at , we might be able to build one for you.
# NextJS Todo (PostgreSQL)
> Under construction.
This template features a simple starter ToDo application template implemented with Next.js. **Next.js** is an open-source React framework that enables developers to build fast, user-friendly web applications with enhanced performance and scalability. It simplifies the creation of server-side rendered and statically generated web pages, offering features like automatic code splitting, optimized prefetching, and an intuitive page-based routing system. This templates also features * Postgres 14.1 database (optional) with out-of-the-box DB connection * TypeScript support * HMR support
# Odoo ERP & CRM
> Under construction.
**Odoo** is an open-source suite of business management applications, combining a range of powerful tools that streamline and integrate various business processes. It offers everything from CRM, sales, and project management, to inventory control, accounting, and human resources, all within a single, user-friendly platform. Known for its flexibility and customizability,  Features * Odoo version 16 plus * PostgreSQL 14.1 database. * Git integration for developing custom modules
# Svelte Todo (PostgreSQL)
> Under construction.
This template features a simple starter ToDo application template implemented with SvelteKit. SvelteKit is a modern framework for building web applications, leveraging the innovative Svelte compiler approach. It simplifies development by writing less code, which gets compiled to highly efficient, imperative code that directly updates the DOM. SvelteKit offers server-side rendering, static site generation, and full-stack capabilities, enabling developers to create fast, scalable, and interactive web experiences with ease. Features * Full TypeScript support * Postgres 14.1 database (optional) with out-of-the-box DB connection * HMR support * CRUD API with SvelteKit form actions.
# Create a Todo List app
> How to set up a Next.js Todo List app together with a Postgresql database.
Ready to try out Diploi, this section will show how to set up a Next.js Todo List app together with a Postgresql database. 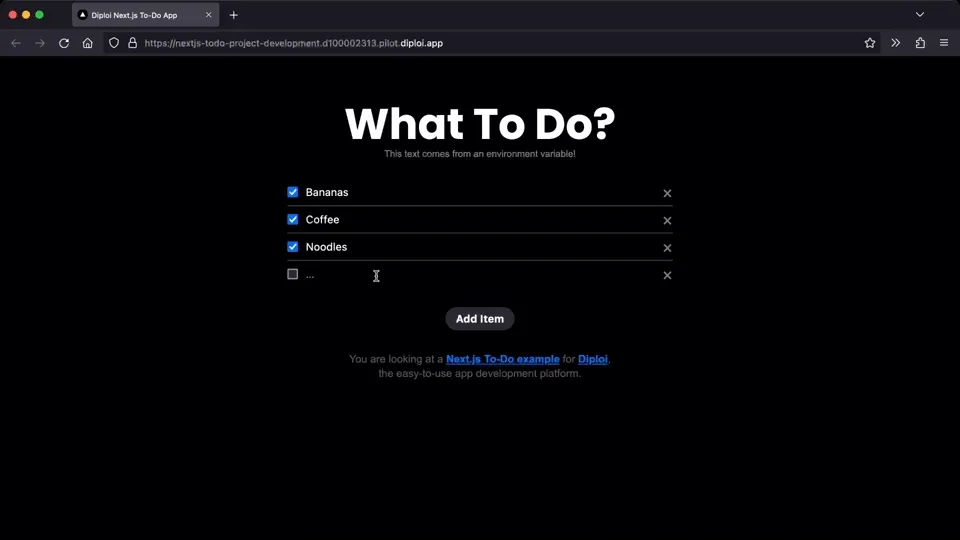 ### Prerequisites * A GitHub account * Text Editor - We recommend [VSCode](https://code.visualstudio.com/) * An SSH Key (for development) - See [Add an SSH Key](/building/add-ssh-key/) ### Create an Account To get started you need a Diploi account. Since Diploi is tightly integrated with GitHub go to [console.diploi.com](https://console.diploi.com) and authenticate using your GitHub account. ### Create a Project Next we will create a project for our app. On the frontpage click **Create Project**. In Diploi, a project template is used to select which containers and features (such as databases) your project will use. From the template list choose **Next.js Starter**. In the project setup screen, we don’t need to change anything, but here you could choose how much resources you application needs or how to connect to the database. 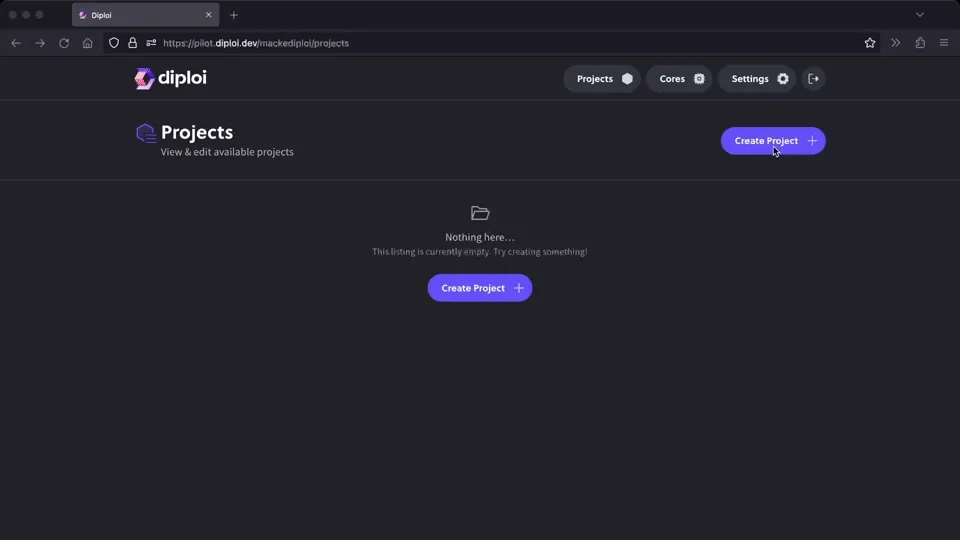 However, we will need to create a GitHub repository for the project. Press **Create a new repository** and follow the instructions on how to give Diploi rights to setup the new repository on your GitHub account. Also give a name for the new repository and choose if you want it to initially be public or not. When done press **Create Project** ### Launch your First Deployment In order to start developing we will need to add a development deployment to our project. Open your new project and press **Create Deployment**. There are a lot of options here, you could choose to create a staging or production environment or we could modify the environment. Since development is preselected the only thing we need to do here is press **Create Deployment**. 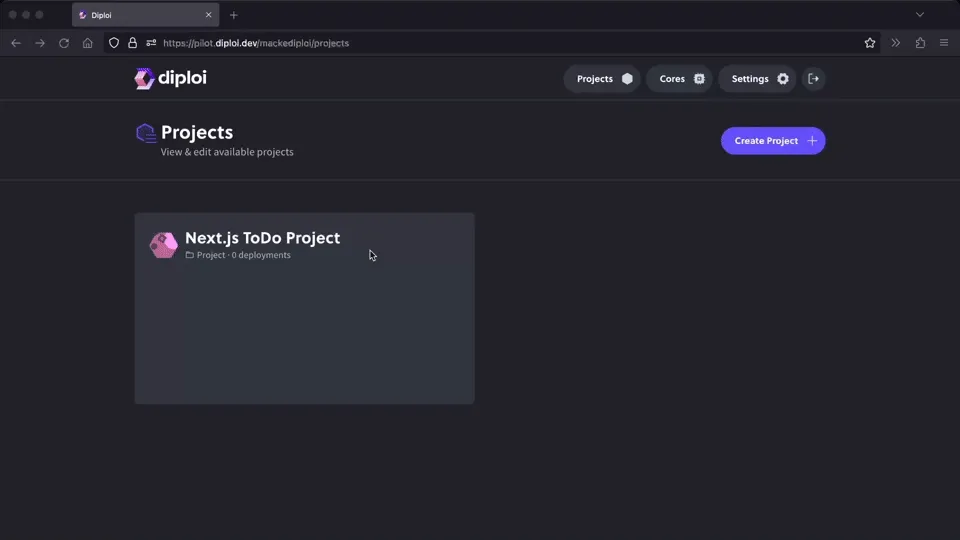 Now you can lean back and watch your deployment starting. You can follow the progress from the status area. 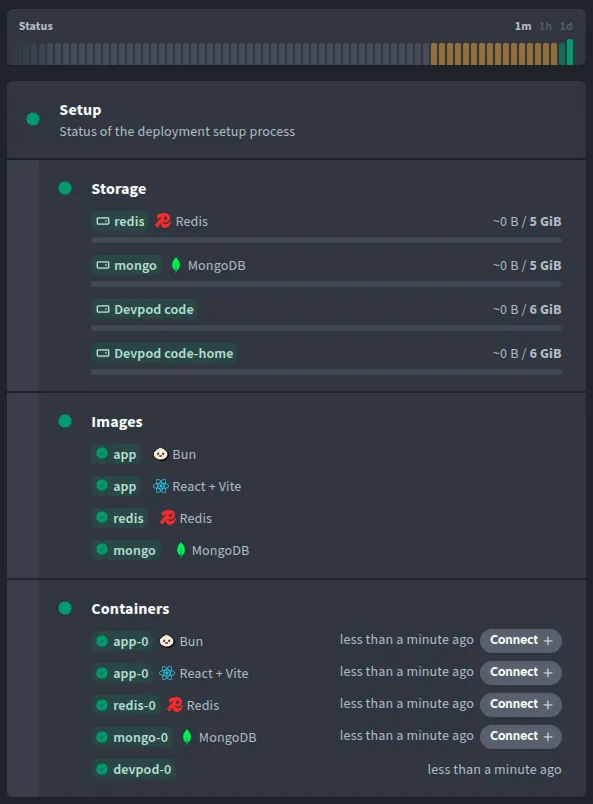 ### Develop Once everything is showing green (shouldn’t take long), you can verify that your site works by clicking on *App* or you can connect remotely using VSCode by clicking the button. You can also connect to the container directly by using SSH. 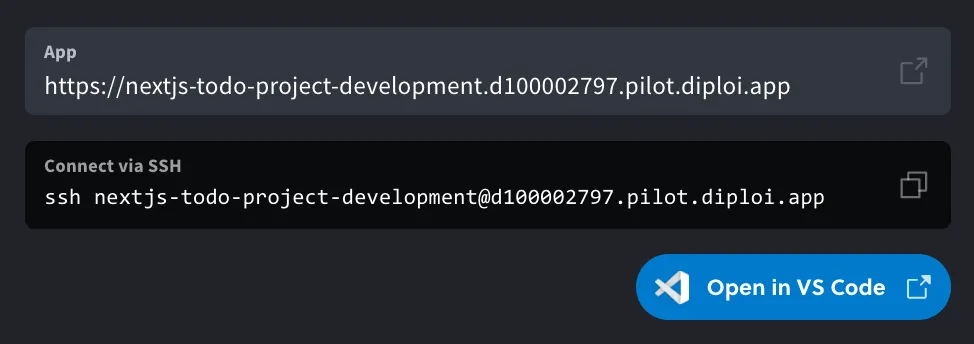 Here’s a short recap of things you can do now: 1. **Edit code remotely** - Changes in the API or React code should be visible instantly since React is running in development mode in this deployment type. 2. **Access the database** - E.g. directly from VSCode using eg. the SQLTools extension. 3. **Commit your code changes** - Git is set up in your remote host so just commit your changes when you are done. If you add production deployments they will update automatically if you commit to the same branch. Can it get much easier?
# Using Add-ons
> Add-ons are used to host services and databases for projects.
### Add-ons Add-ons provide services used by your application. In general, add-ons in Diploi are services that do not require direct development work, which can be services like databases, analytics services, CMS dashboards, etc. #### Add-ons available  **PostgreSQL**  **Redis**  **MongoDB**  **MariaDB**  **MinIO** *** ### PostgreSQL An open-source relational database system known for being reliable, and performant handling complex queries and transactions. [How to add PostgreSQL to a project](/building/add-ons/postgres) [To the add-on’s repository](https://github.com/diploi/addon-postgres) [Official documentation for PostgreSQL](https://www.postgresql.org/docs/) *** ### Redis An in-memory data structure store used as a database, cache, and message broker, known for its high speed and support for various data structures. [How to add Redis to a project](/building/add-ons/redis) [To the add-on’s repository](https://github.com/diploi/addon-redis) [Official documentation for Redis](https://redis.io/docs/latest/) *** ### Mongo A NoSQL document database that stores data in JSON-like documents. [How to add Mongo to a project](/building/add-ons/mongo) [To the add-on’s repository](https://github.com/diploi/addon-mongo) [Official documentation for Mongo](https://www.mongodb.com/docs/manual/) *** ### MariaDB An open-source relational database forked from MySQL, with additional features and performance improvements. [How to add MariaDB to a project](/building/add-ons/mariadb) [To the add-on’s repository](https://github.com/diploi/addon-mariadb) [Official documentation for MariaDB](https://mariadb.com/docs/) *** ### MinIO An S3-compatible object storage service used to save uploads, backups, and other binary data. [How to add MinIO to a project](/building/add-ons/minio) [To the add-on’s repository](https://github.com/diploi/addon-minio) [Official documentation for MinIO](https://docs.min.io/enterprise/aistor-object-store/)
# MariaDB
> Provision MariaDB when your Diploi app needs MySQL compatibility.
MariaDB is a relational database that’s compatible with MySQL, and adds performance and tooling improvements. You can use MariaDB when your project requires a db compatible with MySQL or if you are migrating existing MySQL workloads. ## Add to your project Paste this entry into the `addons` list in `diploi.yaml` to add MariaDB to your project. ```yaml addons: - name: MariaDB identifier: mariadb package: https://github.com/diploi/addon-mariadb#main ``` ## See also * [Using Add-ons](/building/add-ons) * [MariaDB add-on repository](https://github.com/diploi/addon-mariadb) * [MariaDB docs](https://mariadb.com/kb/en/documentation/) * [Learn more about the `diploi.yaml` file](/reference/diploi-yaml)
# MinIO
> Provision MinIO as an S3-compatible Diploi add-on.
MinIO is an open-source, S3-compatible, object storage system that you can run in Diploi. Use this add-on when your components need to store uploads, backups, or other binary data without relying on an external cloud bucket. ## Add to your project Paste this entry into the `addons` list in `diploi.yaml` to add MinIO to your project. ```yaml addons: - name: MinIO identifier: minio package: https://github.com/diploi/addon-minio#main ``` ## See also * [Using Add-ons](/building/add-ons) * [MinIO add-on repository](https://github.com/diploi/addon-minio) * [MinIO docs](https://docs.min.io/enterprise/aistor-object-store/) * [Learn more about the `diploi.yaml` file](/reference/diploi-yaml)
# Mongo
> Attach a Mongo database to Diploi components.
Mongo is a document database that stores flexible JSON-like records with dynamic schemas. Use this add-on when your application benefits from schema-less data modeling or rapid iteration. ## Add to your project Paste this entry into the `addons` list in `diploi.yaml` to add Mongo to your project. ```yaml addons: - name: Mongo identifier: mongo package: https://github.com/diploi/addon-mongo#main ``` ## See also * [Using Add-ons](/building/add-ons) * [Mongo add-on repository](https://github.com/diploi/addon-mongo) * [MongoDB docs](https://www.mongodb.com/docs/) * [Learn more about the `diploi.yaml` file](/reference/diploi-yaml)
# PostgreSQL
> Provision PostgreSQL as a Diploi add-on for relational data.
PostgreSQL is a popular relational database suited for transactional workloads and complex queries. Use this add-on when your application needs structured data storage with ACID guarantees. ## Add to your project Paste this entry into the `addons` list in `diploi.yaml` to add PostgreSQL to your project. ```yaml addons: - name: PostgreSQL identifier: postgres package: https://github.com/diploi/addon-postgres#main ``` ## See also * [Using Add-ons](/building/add-ons) * [PostgreSQL add-on repository](https://github.com/diploi/addon-postgres) * [PostgreSQL docs](https://www.postgresql.org/docs/) * [Learn more about the `diploi.yaml` file](/reference/diploi-yaml)
# Redis
> Add Redis for caching, queues, and ephemeral data in Diploi.
Redis is an in-memory data store ideal for caching, rate limiting, queues, and other latency-sensitive workloads. Choose this add-on when your components need fast key-value access or pub/sub messaging. ## Add to your project Paste this entry into the `addons` list in `diploi.yaml` to add Redis to your project. ```yaml addons: - name: Redis identifier: redis package: https://github.com/diploi/addon-redis#main ``` ## See also * [Using Add-ons](/building/add-ons) * [Redis add-on repository](https://github.com/diploi/addon-redis) * [Redis docs](https://redis.io/docs/latest/) * [Learn more about the `diploi.yaml` file](/reference/diploi-yaml)
# Connecting via SSH
> Diploi utilizes SSH keys for user authentication when establishing SSH connections to deployments.
Diploi utilizes SSH keys for user authentication when establishing SSH connections to deployments. This authentication method is commonly employed for remote development connections, such as those established through VS Code. To add an SSH key to your Diploi profile, you must: * Generate an SSH key pair * Copy the public SSH key * Add the copied content of your public SSH in Diploi That’s it 🙂 Let’s go through each step in detail. ## Generate a new SSH Key pair * Linux 1. Open a terminal and run: `ssh-keygen` which generates by default an ed25519 key pair. 2. You will get a message, asking you to assign a name for the key pair. ```bash Generating public/private ed25519 key pair. Enter file in which to save the key (/home//.ssh/id_ed25519): ``` 3. After that, you will be prompted to add a passphrase. ```bash Enter passphrase (empty for no passphrase): Enter the same passphrase again: ``` 4. Now your new key pair is ready, you will see the following message: ```bash Your identification has been saved in Your public key has been saved in someKey.pub The key fingerprint is: SHA256:gBVtt/m4zes+/0SZPkd+1wwo @ The key's randomart image is: +--[ED25519 256]--+ | o.. | | o . | | . . . | | . o o. .| | . S .= o.| | o o= o . B| | . o o .o.E .=*| | =.+o+..o +..=o| | .+B*=.. . ooo+| +----[SHA256]-----+ ``` * Windows 1. Using Git Bash, Terminal or WSL run: `ssh-keygen` which generates by default an ed25519 key pair. 2. You will get a message, asking you to assign a name for the key pair. ```bash Generating public/private ed25519 key pair. Enter file in which to save the key (/home//.ssh/id_ed25519): ``` 3. After that, you will be prompted to add a passphrase. ```bash Enter passphrase (empty for no passphrase): Enter the same passphrase again: ``` 4. Now your new key pair is ready, you will see the following message: ```bash Your identification has been saved in Your public key has been saved in someKey.pub The key fingerprint is: SHA256:gBVtt/m4zes+/0SZPkd+1wwo @ The key's randomart image is: +--[ED25519 256]--+ | o.. | | o . | | . . . | | . o o. .| | . S .= o.| | o o= o . B| | . o o .o.E .=*| | =.+o+..o +..=o| | .+B*=.. . ooo+| +----[SHA256]-----+ ``` * Mac 1. Open Terminal and run: `ssh-keygen` which generates by default an ed25519 key pair. 2. You will get a message, asking you to assign a name for the key pair. ```bash Generating public/private ed25519 key pair. Enter file in which to save the key (/home//.ssh/id_ed25519): ``` 3. After that, you will be prompted to add a passphrase. ```bash Enter passphrase (empty for no passphrase): Enter the same passphrase again: ``` 4. Now your new key pair is ready, you will see the following message: ```bash Your identification has been saved in Your public key has been saved in someKey.pub The key fingerprint is: SHA256:gBVtt/m4zes+/0SZPkd+1wwo @ The key's randomart image is: +--[ED25519 256]--+ | o.. | | o . | | . . . | | . o o. .| | . S .= o.| | o o= o . B| | . o o .o.E .=*| | =.+o+..o +..=o| | .+B*=.. . ooo+| +----[SHA256]-----+ ``` ## Copy the public key generated * Linux 1. ssh-keygen generates two files, one with an extension `.pub` and the other without any extension, eg. `someKey.pub` and `someKey`. The one we need right now is `someKey.pub`, which is your public key. You need to copy the contents of your `.pub` file. You can use the `cat` command: ```bash cat someKey.pub ``` 2. By using `cat` you will print the content of the `someKey.pub` file, it will look like this: ```bash ssh-ed25519 AA786grtyreugigyuwifewy65643354qWrjhBLtBSewyweRTIZw5DqD0zj @ ``` All you need to do is copy the entire output. * Windows 1. ssh-keygen generates two files, one with an extension `.pub` and the other without any extension, eg. `someKey.pub` and `someKey`. The one we need right now is `someKey.pub`, which is your public key. You need to copy the contents of your `.pub` file. You can use the `cat` command: ```bash cat someKey.pub ``` 2. By using `cat` you will print the content of the `someKey.pub` file, it will look like this: ```bash ssh-ed25519 AA786grtyreugigyuwifewy65643354qWrjhBLtBSewyweRTIZw5DqD0zj @ ``` All you need to do is copy the output. * Mac 1. ssh-keygen generates two files, one with an extension `.pub` and the other without any extension, eg. `someKey.pub` and `someKey`. The one we need right now is `someKey.pub`, which is your public key. You need to copy the contents of your `.pub` file. You can use the `cat` command: ```bash cat someKey.pub ``` 2. By using `cat` you will print the content of the `someKey.pub` file, it will look like this: ```bash ssh-ed25519 AA786grtyreugigyuwifewy65643354qWrjhBLtBSewyweRTIZw5DqD0zj @ ``` All you need to do is copy the entire output. ## Add your public key in Diploi Now that you copied the contents of your public key, you need to add it to your Diploi profile: 1. Go to [your profile settings](https://console.diploi.com/settings). 2. Select “Add new SSH key”. 3. Provide a description for your key, such as “Work MacBook,” to help you remember its origin or purpose. 4. Paste your SSH “public key” into the designated field. 5. Click the “Add SSH Key” button. 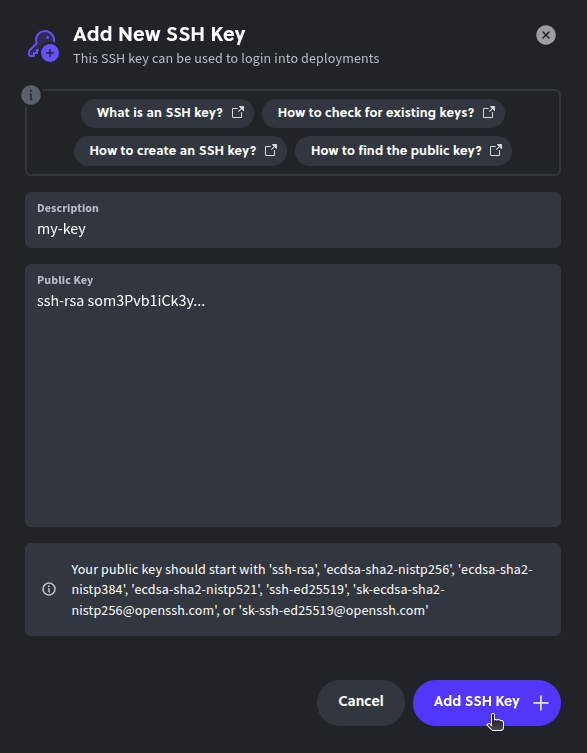 Caution Never share your SSH private key with anyone! This key grants access to any deployment you have privileges for, allowing others to authenticate as you. That’s it! Now you can access your deployments using SSH.
# Using Components
> Components are the core building block in Diploi.
## Components You can think of components as the application layer of your project. In Diploi you can have multiple options available to define your application, which you can mix as you wish. #### Components available  **n8n** new  **Laravel** new  **FastAPI** new  **Flask** new  **Deno** new  **Supabase** new  **Next.js**  **Node.js**  **Bun**  **React + Vite**  **Astro**  **SvelteKit**  **Nue**  **Ghost**  **Hono**  **Lovable**  **Django** beta *** ### Ghost An open-source content management system designed for publishing and managing blogs, online publications or websites. [To the tutorial ](https://diploi.com/blog/hosting_a_ghost_blog) [How to add Ghost to a project ](/building/components/ghost) [To the component's repository ](https://github.com/diploi/component-ghost) [Official documentation for Ghost ](https://ghost.org/help/manual/) *** ### Next.js A React-based web development framework for server-side and static web rendering. [To the tutorial ](https://diploi.com/blog/hosting_nextjs_apps) [How to add Next.js to a project ](/building/components/nextjs) [To the component's repository ](https://github.com/diploi/component-nextjs) [Official documentation for Next.js ](https://nextjs.org/docs) *** ### React + Vite Mixes Vite’s bundling capabilities and React’s frontend development capabilities, in a component that requires no configuration and provides instant hot module reload for frontend applications. [To the tutorial ](https://diploi.com/blog/hosting_react_apps) [How to add React + Vite to a project ](/building/components/react-vite) [To the component's repository ](https://github.com/diploi/component-react-vite) [Official documentation for Vite ](https://vite.dev/guide/) [Official documentation for React ](https://react.dev/reference/react) *** ### Node.js A runtime used to develop backend applications and APIs using JavaScript. [To the tutorial ](https://diploi.com/blog/hosting_node_apps) [How to add Node.js to a project ](/building/components/nodejs) [To the component's repository ](https://github.com/diploi/component-nodejs) [Official documentation for Node.js ](https://nodejs.org/docs/latest/api/) *** ### Bun An JavaScript runtime designed to be faster than Node.js, with native bundling, support for TypeScript, and package management support. [To the tutorial ](https://diploi.com/blog/hosting_bun_apps) [How to add Bun to a project ](/building/components/bun) [To the component's repository ](https://github.com/diploi/component-bun) [Official documentation for Bun ](https://bun.sh/docs) *** ### Astro A static site builder that lets you write components with your a broad selection of frontend frameworks, while optimizing for performance and modern SEO practices. [To the tutorial ](https://diploi.com/blog/hosting_astro_apps) [How to add Astro to a project ](/building/components/astro) [To the component's repository ](https://github.com/diploi/component-astro) [Official documentation for Astro ](https://docs.astro.build/en/getting-started/) *** ### SvelteKit A framework for building performant web applications with Svelte, offering server-side rendering. [To the tutorial ](https://diploi.com/blog/hosting_svelte_apps) [How to add SvelteKit to a project ](/building/components/sveltekit) [To the component's repository ](https://github.com/diploi/component-sveltekit) [Official documentation for SvelteKit ](https://svelte.dev/docs/kit/introduction) *** ### Nue.js A framework focused on building lightweight fullstack applications using JavaScript, and with native support for Rust or Zig to run workloads. [To the tutorial ](https://diploi.com/blog/hosting_nuejs_apps) [How to add Nue.js to a project ](/building/components/nue) [To the component's repository ](https://github.com/diploi/component-nue) [Official documentation for Nue.js ](https://nuejs.org/docs/) *** ### Django A high-level Python web fullstack framework that uses Python. [To the tutorial ](https://diploi.com/blog/hosting_django_apps) [How to add Django to a project ](/building/components/django) [To the component's repository ](https://github.com/diploi/component-django) [Official documentation for Django ](https://docs.djangoproject.com/en/5.2/) *** ### Hono A small web framework designed to build APIs and backend applications. [To the tutorial ](https://diploi.com/blog/hosting_hono_apps) [How to add Hono to a project ](/building/components/hono) [To the component's repository ](https://github.com/diploi/component-hono) [Official documentation for Hono ](https://hono.dev/docs/) *** ### Deno A JavaScript and TypeScript runtime for APIs and backend services. [To the tutorial ](https://diploi.com/blog/hosting_deno_apps) [How to add Deno to a project ](/building/components/deno) [To the component's repository ](https://github.com/diploi/component-deno) [Official documentation for Deno ](https://docs.deno.com/runtime/manual) *** ### FastAPI A Python framework used to create APIs with automatic documentation. [To the tutorial ](https://diploi.com/blog/hosting_fastapi_apps) [How to add FastAPI to a project ](/building/components/fastapi) [To the component's repository ](https://github.com/diploi/component-fastapi) [Official documentation for FastAPI ](https://fastapi.tiangolo.com/) *** ### Flask A minimalist Python framework, design for lightweight APIs, dashboards, services, and fullstack applications. [To the tutorial ](https://diploi.com/blog/hosting_flask_apps) [How to add Flask to a project ](/building/components/flask) [To the component's repository ](https://github.com/diploi/component-flask) [Official documentation for Flask ](https://flask.palletsprojects.com/) *** ### Laravel A fullstack PHP framework with native support for modern JS-based frontend frameworks. [To the tutorial ](https://diploi.com/blog/hosting_laravel_apps) [How to add Laravel to a project ](/building/components/laravel) [To the component's repository ](https://github.com/diploi/component-laravel) [Official documentation for Laravel ](https://laravel.com/docs) *** ### n8n A workflow automation platform used to run trigger-driven workloads, using a GUI to setup triggers and logic workflow. [To the tutorial ](https://diploi.com/blog/hosting_n8n) [How to add n8n to a project ](/building/components/n8n) [To the component's repository ](https://github.com/diploi/component-n8n) [Official documentation for n8n ](https://docs.n8n.io/) *** ### Supabase An open-source backend platform that bundles multiple services into one, such as Postgres, storage, auth, real-time listeners, and edge functions. [To the tutorial ](https://diploi.com/blog/hosting_supabase) [How to add Supabase to a project ](/building/components/supabase) [To the component's repository ](https://github.com/diploi/component-supabase) [Official documentation for Supabase ](https://supabase.com/docs)
# Astro
> Ship Astro sites with Diploi-managed builds and hosting.
Astro is a modern static site builder focused on shipping minimal JavaScript to the browser. Choose this component when you are delivering content-heavy marketing sites, blogs, or documentation that benefit from fast page loads. Diploi handles the SSR build pipeline and pushes assets where they need to run. ## Add to your project Paste this entry into the `components` list in `diploi.yaml` to add Astro to your project. ```yaml components: - name: Astro identifier: astro package: https://github.com/diploi/component-astro#main ``` ## See also * [Using Components](/building/components) * [Astro component repository](https://github.com/diploi/component-astro) * [Astro docs](https://docs.astro.build/) * [Learn more about the `diploi.yaml` file](/reference/diploi-yaml)
# Bun
> Deploy Bun apps and tooling with Diploi.
Bun is a high-performance JavaScript runtime that includes a bundler, test runner, and package manager. Use this component when you want Bun’s fast startup times and all-in-one tooling for web services or utilities. Diploi handles the deployment so you can take advantage of Bun without custom infrastructure. ## Add to your project Paste this entry into the `components` list in `diploi.yaml` to add Bun to your project. ```yaml components: - name: Bun identifier: bun package: https://github.com/diploi/component-bun#main ``` ## See also * [Using Components](/building/components) * [Bun component repository](https://github.com/diploi/component-bun) * [Bun docs](https://bun.sh/docs) * [Learn more about the `diploi.yaml` file](/reference/diploi-yaml)
# Deno
> Run Deno apps on Diploi with automated builds and deploys.
Deno is a secure JavaScript and TypeScript runtime with batteries-included tooling and standards-based APIs. Use this component when you want Diploi to manage cache-friendly builds and keep Deno services updated without self-hosting. ## Add to your project Paste this entry into the `components` list in `diploi.yaml` to add Deno to your project. ```yaml components: - name: Deno identifier: deno package: https://github.com/diploi/component-deno#main ``` ## See also * [Using Components](/building/components) * [Deno component repository](https://github.com/diploi/component-deno) * [Deno docs](https://docs.deno.com/runtime/manual) * [Learn more about the `diploi.yaml` file](/reference/diploi-yaml)
# Django
> Run Django projects on Diploi with managed deploys.
Django is a batteries-included Python framework for building secure, database-driven applications. Use this component when you need an admin interface, ORM, and templating system out of the box. Diploi provisions the deployment pipeline so you can focus on models and views instead of infrastructure. ## Add to your project Paste this entry into the `components` list in `diploi.yaml` to add Django to your project. ```yaml components: - name: Django identifier: django package: https://github.com/diploi/component-django#main ``` ## See also * [Using Components](/building/components) * [Django component repository](https://github.com/diploi/component-django) * [Django docs](https://docs.djangoproject.com/en/stable/) * [Learn more about the `diploi.yaml` file](/reference/diploi-yaml)
# FastAPI
> Deploy FastAPI services through Diploi’s managed component.
FastAPI is a modern, async Python framework that makes it easy to build performant APIs with automatic OpenAPI docs. Use this component when you want Diploi to run uvicorn builds and handle deploys so you can focus on type-safe endpoints and business logic. ## Add to your project Paste this entry into the `components` list in `diploi.yaml` to add FastAPI to your project. ```yaml components: - name: FastAPI identifier: fastapi package: https://github.com/diploi/component-fastapi#main ``` ## See also * [Using Components](/building/components) * [FastAPI component repository](https://github.com/diploi/component-fastapi) * [FastAPI docs](https://fastapi.tiangolo.com/) * [Learn more about the `diploi.yaml` file](/reference/diploi-yaml)
# Flask
> Deploy lightweight Flask services on Diploi without custom infra.
Flask is a minimalist Python framework for APIs, dashboards, and microservices. Use this component when you want Diploi to handle the build steps, gunicorn/uvicorn configuration, and deployments while you focus on routes and extensions. ## Add to your project Paste this entry into the `components` list in `diploi.yaml` to add Flask to your project. ```yaml components: - name: Flask identifier: flask package: https://github.com/diploi/component-flask#main ``` ## See also * [Using Components](/building/components) * [Flask component repository](https://github.com/diploi/component-flask) * [Flask docs](https://flask.palletsprojects.com/) * [Learn more about the `diploi.yaml` file](/reference/diploi-yaml)
# Ghost
> Host Ghost to publish blogs and newsletters with Diploi.
Ghost is an open-source content platform for publishing blogs, newsletters, and membership sites. Use this component when you want Diploi to manage builds and deployments for a Ghost site. It keeps your content workflow together with the infrastructure that serves it. ## Add to your project Paste this entry into the `components` list in `diploi.yaml` to add Ghost to your project. ```yaml components: - name: Ghost identifier: ghost package: https://github.com/diploi/component-ghost#main env: include: - mariadb.MARIADB_HOST:database__connection__host - mariadb.MARIADB_USER:database__connection__user - mariadb.MARIADB_PASSWORD:database__connection__password ``` ## See also * [Using Components](/building/components) * [Ghost component repository](https://github.com/diploi/component-ghost) * [Ghost docs](https://ghost.org/docs/) * [Learn more about the `diploi.yaml` file](/reference/diploi-yaml)
# Hono
> Deploy lightweight Hono APIs across Diploi’s infrastructure.
Hono is a tiny, high-performance web framework tuned for edge and serverless workloads. Choose this component when you need fast APIs or request handlers with minimal overhead. Diploi takes care of packaging and deploying so you can focus on routing and middleware logic. ## Add to your project Paste this entry into the `components` list in `diploi.yaml` to add Hono to your project. ```yaml components: - name: Hono identifier: hono package: https://github.com/diploi/component-hono#main ``` ## See also * [Using Components](/building/components) * [Hono component repository](https://github.com/diploi/component-hono) * [Hono docs](https://hono.dev/docs) * [Learn more about the `diploi.yaml` file](/reference/diploi-yaml)
# Laravel
> Deploy Laravel applications on Diploi with managed builds and releases.
Laravel is a modern PHP framework with expressive routing, ORM, queues, and first-class testing utilities. Use this component when you want Diploi to run the build pipeline, publish assets, and keep your Laravel workloads updated without manually scripting servers. ## Add to your project Paste this entry into the `components` list in `diploi.yaml` to add Laravel to your project. ```yaml components: - name: Laravel identifier: laravel package: https://github.com/diploi/component-laravel#main # Optional: # env: # include: # - mariadb.* ``` ## See also * [Using Components](/building/components) * [Laravel component repository](https://github.com/diploi/component-laravel) * [Laravel docs](https://laravel.com/docs) * [Learn more about the `diploi.yaml` file](/reference/diploi-yaml)
# n8n
> Automate workflows with the n8n component managed by Diploi.
n8n is a workflow automation platform for connecting APIs, services, and custom logic. Use this component when you need Diploi to build and deploy n8n so you can focus on building workflows, not configuring runtime environments. ## Add to your project Paste this entry into the `components` list in `diploi.yaml` to add n8n to your project. ```yaml components: - name: n8n identifier: n8n package: https://github.com/diploi/component-n8n#v1.112.4 env: include: - postgres.POSTGRES_HOST:DB_POSTGRESDB_HOST - postgres.POSTGRES_PORT:DB_POSTGRESDB_PORT - postgres.POSTGRES_USER:DB_POSTGRESDB_USER - postgres.POSTGRES_PASSWORD:DB_POSTGRESDB_PASSWORD addons: - name: PostgreSQL identifier: postgres package: https://github.com/diploi/addon-postgres#v17.2 ``` Caution In n8n, you must use the environment variable names defined by their documentation. For more information check: ## See also * [Using Components](/building/components) * [n8n component repository](https://github.com/diploi/component-n8n) * [n8n docs](https://docs.n8n.io/) * [Learn more about the `diploi.yaml` file](/reference/diploi-yaml)
# Next.js
> Deploy production-ready Next.js apps with server rendering on Diploi.
Next.js is a React framework for building server-rendered and statically generated applications. Choose this component when you want Diploi to handle optimized builds, routing, and image processing without extra configuration. It works well for SaaS dashboards, marketing pages, and any React project that needs reliable hosting. ## Add to your project Paste this entry into the `components` list in `diploi.yaml` to add Next.js to your project. ```yaml components: - name: Next.js identifier: nextjs package: https://github.com/diploi/component-nextjs#main ``` ## See also * [Using Components](/building/components) * [Next.js component repository](https://github.com/diploi/component-nextjs) * [Next.js docs](https://nextjs.org/docs) * [Learn more about the `diploi.yaml` file](/reference/diploi-yaml)
# Node.js
> Run general-purpose Node.js services on Diploi.
The Node.js component gives you a standard runtime for JavaScript or TypeScript backends. Reach for it when you need an API, webhook processor, or background worker built with the Node ecosystem. Diploi builds and deploys your code while keeping environment variables and dependencies managed. ## Add to your project Paste this entry into the `components` list in `diploi.yaml` to add Node.js to your project. ```yaml components: - name: Node.js identifier: nodejs package: https://github.com/diploi/component-nodejs#main ``` ## See also * [Using Components](/building/components) * [Node.js component repository](https://github.com/diploi/component-nodejs) * [Node.js docs](https://nodejs.org/en/docs) * [Learn more about the `diploi.yaml` file](/reference/diploi-yaml)
# Nue.js
> Deploy Nue.js apps with Diploi handling builds and deploys.
Nue.js is a minimal framework for composing modular web applications with fast SSR. Pick this component when you want Nue’s lean runtime while keeping deployment automation simple. Diploi runs the build and serves the output so you can focus on your UI modules. ## Add to your project Paste this entry into the `components` list in `diploi.yaml` to add Nue.js to your project. ```yaml components: - name: Nue.js identifier: nue package: https://github.com/diploi/component-nue#main ``` ## See also * [Using Components](/building/components) * [Nue.js component repository](https://github.com/diploi/component-nue) * [Nue.js docs](https://nuejs.org/docs/) * [Learn more about the `diploi.yaml` file](/reference/diploi-yaml)
# React + Vite
> Bundle React apps quickly with the React + Vite component.
The React + Vite component pairs Vite’s fast bundler with a ready-to-serve React runtime. Use it when you need quick rebuilds, hot module reload, and a lightweight deployment target for frontend projects. Diploi handles the build pipeline so you can focus on UI work. ## Add to your project Paste this entry into the `components` list in `diploi.yaml` to add React + Vite to your project. ```yaml components: - name: React + Vite identifier: react-vite package: https://github.com/diploi/component-react-vite#main ``` ## See also * [Using Components](/building/components) * [React + Vite component repository](https://github.com/diploi/component-react-vite) * [React docs](https://react.dev/learn) * [Vite docs](https://vitejs.dev/guide/) * [Learn more about the `diploi.yaml` file](/reference/diploi-yaml)
# Supabase
> Deploy Supabase edge functions and services using Diploi components.
Supabase bundles Postgres, real-time listeners, storage, and auth with edge functions. Use this component when you want Diploi to manage Supabase deployments alongside the rest of your stack so you can ship a unified backend without wiring infrastructure by hand. ## Add to your project Paste this entry into the `components` list in `diploi.yaml` to add Supabase to your project. ```yaml components: - name: Supabase identifier: supabase package: https://github.com/diploi/component-supabase#main ``` ## See also * [Using Components](/building/components) * [Supabase component repository](https://github.com/diploi/component-supabase) * [Supabase docs](https://supabase.com/docs) * [Learn more about the `diploi.yaml` file](/reference/diploi-yaml)
# SvelteKit
> Deploy full-stack SvelteKit apps through Diploi.
SvelteKit combines Svelte’s component model with server-side rendering, routing, and adapters. Use this component when you need a fast Svelte frontend that can fetch data server-side or run API endpoints. Diploi runs the build and deployment steps so your project ships with predictable infrastructure. ## Add to your project Paste this entry into the `components` list in `diploi.yaml` to add SvelteKit to your project. ```yaml components: - name: SvelteKit identifier: sveltekit package: https://github.com/diploi/component-sveltekit#main ``` ## See also * [Using Components](/building/components) * [SvelteKit component repository](https://github.com/diploi/component-sveltekit) * [SvelteKit docs](https://kit.svelte.dev/docs) * [Learn more about the `diploi.yaml` file](/reference/diploi-yaml)
# Using Remote Development
> How to develop remotely with Diploi.
At the heart of Diploi lies remote development, allowing you to easily work on any of your projects without the need for software installation or maintenance on your local machine, or dealing with containers. With a single click, you can begin your work without local installation hassle. [Remote development using Cursor and Diploi](https://www.youtube.com/embed/gHeJ-gwCtlg?si=1KroAeD_epe538wF) ## Getting Started Diploi is designed to make remote development as seamless as possible. You can start developing on any of your deployments with just a few clicks. All you need is to create a development deployment in your project, which will provide you with a remote environment. You can access development environments through the browser IDE, or connect to them using your favorite IDE via SSH. 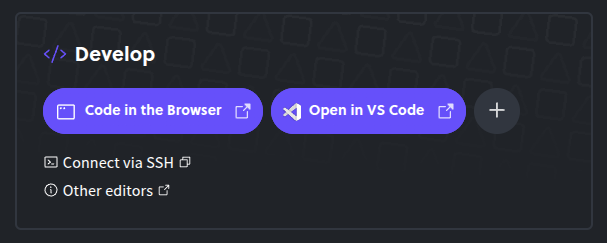 ### Using Diploi’s Browser IDE Diploi offers a built-in browser IDE that allows you to start coding immediately without any setup. This is ideal for quick edits or when you need to make changes on the go. To access the browser IDE, navigate to your deployment’s “Overview” tab, found at: `https://console.diploi.com//project//deployment/` From there, you can click on the “Code in the browser” button, which will open the browser IDE in a new tab. ### Using Your Local IDE To connect to your remote development environment using your own IDE, you need to add your public SSH key, which you can do by following the instructions in our [SSH guide](/building/add-ssh-key/). Diploi officially supports: * [VS Code](https://code.visualstudio.com/) with the [Remote Development extension](https://marketplace.visualstudio.com/items?itemName=ms-vscode-remote.vscode-remote-extensionpack) * [Cursor](https://www.cursor.com/) #### Connecting you IDE If it is the first time you are connecting to a deployment, you will need to add your IDE to the “Develop” section of your deployment, by clicking on the plus icon next to the “Code in the Browser” button. 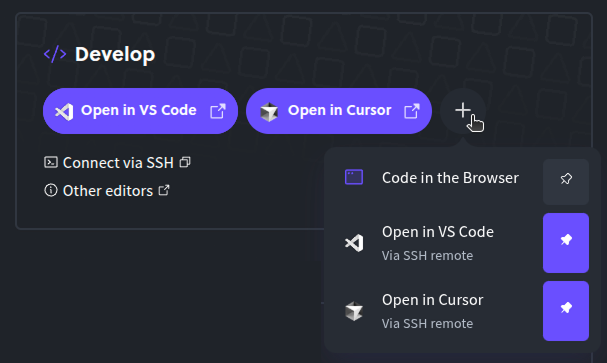 Caution If you are developing on a Windows machine with WSL enabled, please note that a Windows VS Code install uses SSH keys on your **Windows** user by default. #### Configuration Your local VS Code configuration will be used for all remote environments, but certain features (like extensions) need to be configured on a per-deployment basis. ### Other IDEs Caution Diploi currently has built-in persistent configuration for VS Code only. This means that you will have to configure/install your other IDE again after a deployment upgrade. Diploi supports any IDE capable of connecting to a remote machine via SSH. This includes terminal-based IDEs like Vim. #### Terminal Based IDEs Simply open an SSH connection to your deployment, and install your favorite IDE.
# Creating a Deployment
> How to create a new deployment for a project
After you create a Project, a development deployment is automatically created for you, and you can create additional deployments for staging and production environments, or other development environments as needed. *** ## Launching a New Deployment To launch a new deployment, go to the **Deployments** tab inside of your Project: `https://console.diploi.com//project/` And there, you can click on the **Create Deployment** button to launch the deployment creation wizard. [The easiest way to start Remote Development Environments and code without local install using Diploi](https://www.youtube.com/embed/Xu96kVVzgqY?si=Gceaf_vBGXOhcb_x) ### Deployment Types To start a deployment, you have three different options: * **Development** which allows you to start a server on which you can start a remote development environment using VSCode or our browser IDE, or connect directly to the server via SSH. For more about remote development, check out our [Remote Development guide](/building/remote-development/). * **Staging** to test your application and ensure stability before launching changes in your application to production. * **Production** to launch your application when it is ready to be used by your end users. ### Choosing a Deployment Size Once you choose the type of deployment you need, choose the size that the deployment should have. The available deployment sizes include: \- **S** - 2 vCPUs and 4 GB of ram - **0,026 €/hour** \- **M** - 2 vCPUs and 8 GB of ram - **0,048 €/hour** \- **L** - 4 vCPUs and 16 GB of ram - **0,089 €/hour** \- **XL** - 8 vCPUs and 32 GB of ram - **0,182 €/hour** 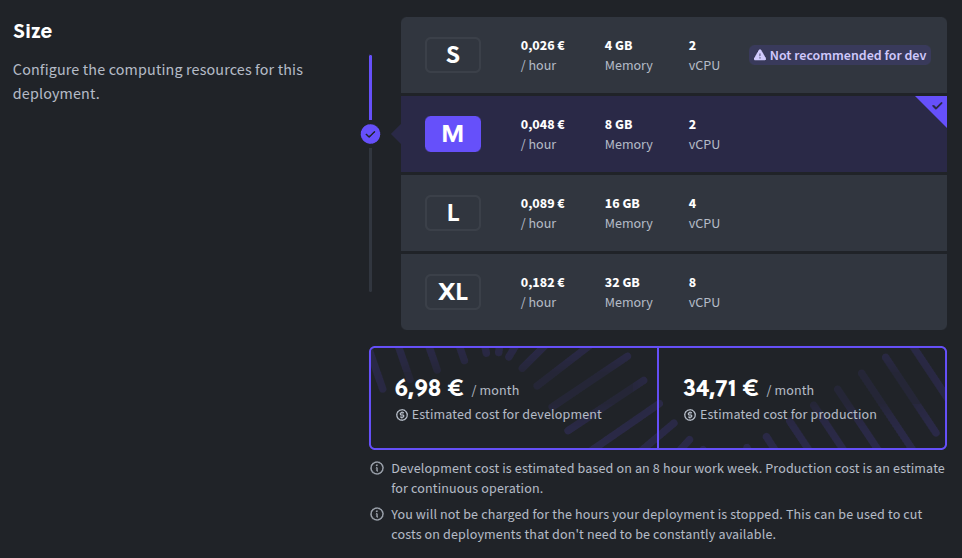 Once you have configured the type and size of your deployment, you can click on the **Create Deployment** button to start your deployment. ## Connecting via SSH to a Deployment If you need to connect via SSH to your deployment, you can do it by getting the SSH connection string from the “Components” and “Add-ons” sections found at the bottom of the “Overview” tab of your deployment, found at: `https://console.diploi.com//project//deployment/` From there, you can copy the SSH connection string for the component or add-on you want to connect to by clicking on the “Connect +” button next to the component or add-on. For more information on how to connect to your deployment via SSH, check out our [SSH guide](/building/add-ssh-key/). 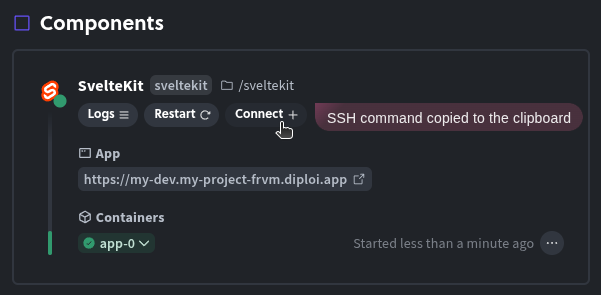 *** ## Shutting Down a Deployment If you want to stop a deployment from running, all you need to do is click on the “enabled” switch from the **Deployments** tab inside of your Project. 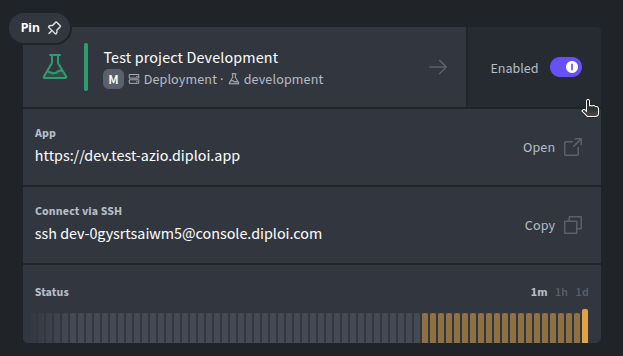 Alternatively, you can also shutdown a deployment by clicking on the “enabled” switch found at the top of your Deployment’s status page.  You can restart your Deployment at any time by clicking on the same switch you used for shutdown. When you click on the switch, a dropdown will appear allowing you to choose the amount of time you want the deployment to be active for. 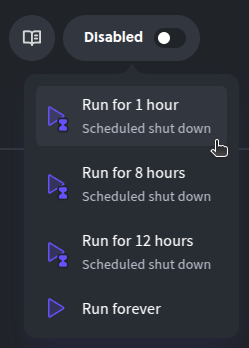
# Creating a Project
> How to create a new project
In Diploi, the process to host a new application online, starts by creating a new Project, which will let you the stack of the application you want to deploy, and then launching a Deployment which will run the application online. The overall process to launch a new application is as follows:  ## Create a Project In Diploi, a project refers to a combination of **components** and **add-ons** (also called **services**) that form the **stack** that will make up your application. To create a project for your app click **Create Project** from your dashboard: `https://console.diploi.com//projects` Which will open the **Stack Builder** where you can choose the components and add-ons for your project. ### Selecting Components  ### Selecting Add-ons 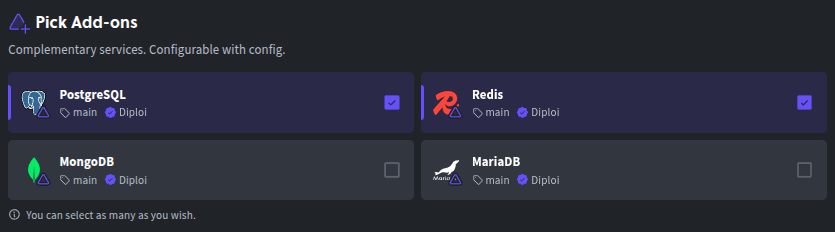 Once you have chosen the stack for your project, you will be able to see a preview of your selected stack. ### Stack Preview 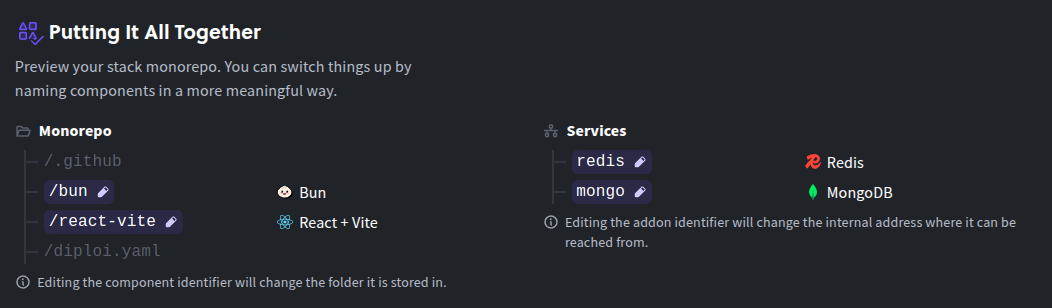 In the preview you can edit the identifier for each component and add-on you have selected by clicking on the previewed elements of your stack. This will change the folder name of the components in your monorepo and the internal hostname of your add-ons. 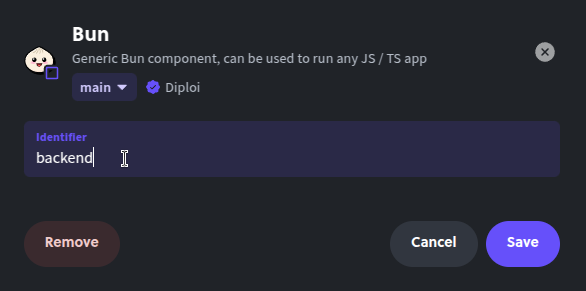 ### Choosing a GitHub Repository The last step before launching your project is to configure how your new application’s code will be stored. You have two options available: * **Launch Without a Repository** where you can launch a project without a repository to store your code. This is ideal for testing, where you can run simple scripts or applications which must be accessible online. Learn more about [Launch Without a Repository](/reference/projects/project#launch-without-a-repository). * **Create Repository** where a new repository will be created for your project. Ideal for launching new application intended for production. By creating a new repository for your project, you automagically enable Diploi’s push-to-deployment pipeline, where changes in your repository’s will update the state of your deployment. Learn more about [Create Repository](/reference/projects/project#project-with-repository). 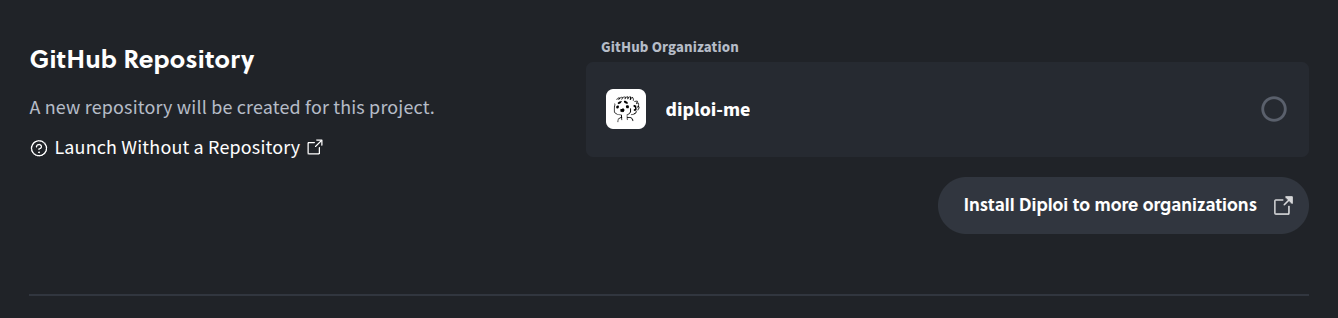 Now that you have selected your preferred stack and the configuration of your project, you can complete the creation of the project by clicking **Launch Stack**. For both types of projects, when you finish creating a new project, a new development deployment will be started for your project, which you can use to start developing your application right away.
# Adding Custom Domains
> Diploi offers the flexibility to configure custom domains on two levels.
Diploi offers the flexibility to configure custom domains on two levels: at the **project** level and at the **deployment** level. ## Project At the project level, you can configure a custom `diploi.app` subdomain that will serve as the base domain for all autogenerated subdomains on deployments. Any new deployment created will automatically use the project’s domain as their base domain name. For example, if you configure `mycompany.diploi.app` as the custom domain at the project level, all autogenerated subdomains will be created as subdomains of `mycompany.diploi.app` (e.g. `app-production.mycompany.diploi.app`, `app-development.mycompany.diploi.app`, etc.). ## Deployment If you want to use a custom domain, eg. `mycompany.com` you can do it by defining a custom domain for a deployment. This provides more fine-grained control over your domain configuration and enables you to override the autogenerated subdomains created at the project level. ### Configuring a Custom Subdomain e.g. `app.example.com` All you need to do is: 1. Access your domain DNS records. 2. Create a new CNAME record, pointing to `edge.diploi.me` and using for name, the subdomain you want to use. 3. Add your custom domain in your Project or Deployment. 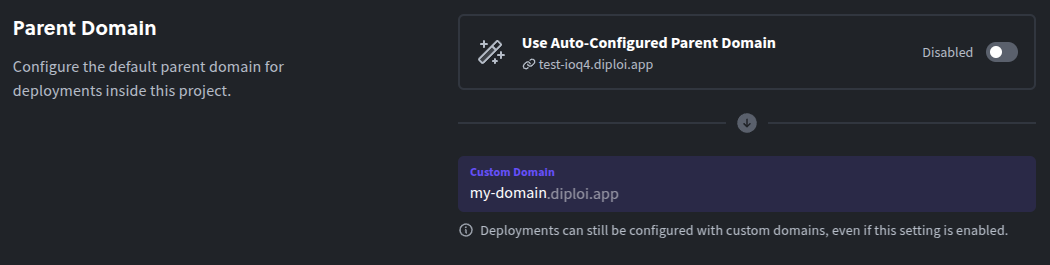 ### Configuring a Custom Root Domain e.g. `example.com` Root domains (also called apex or base domains) do not officially support CNAME records, which Diploi needs. Many DNS providers offer similar functionality with custom record types like ALIAS or ANAME.\ To point an apex domain to Diploi, you should refer to your DNS providers own instructions.\ We have created a table which lists the recommended records to use with some of the most popular DNS providers: | Provider | Record | Value | | ------------- | ------ | ---------------- | | Cloudflare | CNAME | `edge.diploi.me` | | Namecheap | ALIAS | `edge.diploi.me` | | easyDNS | ANAME | `edge.diploi.me` | | PointDNS | ALIAS | `edge.diploi.me` | | DNS Made Easy | ANAME | `edge.diploi.me` | | DNSimple | ALIAS | `edge.diploi.me` | | DreamHost | ALIAS | `edge.diploi.me` |
# FAQ
> Frequently asked questions about Diploi
## Getting Started ## Features & Capabilities ## Pricing & Plans ## Security & Data ## Technical Questions ## Support & Community ## Still Have Questions? If you didn’t find the answer you’re looking for: * **Join our [Discord community](https://discord.gg/vvgQxVjC8G)** for real-time help * **Contact us directly** at We’re here to help and always appreciate feedback on how we can improve our documentation!
# Get Started
> How to set up a server with components and add-ons.
## Using Diploi When you launch a new Project using Diploi, you get a repository in your GitHub account, which is fully configured. All you need to launch a new Project, is to sign up using a Github account. [Code without local installations and deploy with one click using this platform](https://www.youtube.com/embed/rsnqJ2QzMIY?si=f6jpNevvuOZbxKq6) *** ## Launching a new application When you register, you get access to [the Diploi dashboard](https://console.diploi.com) which allows you to create projects where you can collaborate with your team, connect to remote development environment, and create development, staging, and production deployments. ### Test-driving Diploi You can try out Diploi without registering, by starting a trial from our homepage, visit [diploi.com/#StackBuilder](https://diploi.com/#StackBuilder), select the stack you want to test out and click launch. This will start a trial environment where you can try most features that Diploi has to offer in a development deployment. This deployment stays active for 1 hour and can be claimed by registering an account. #### Starting a trial from the Homepage Quick Launch is the fastest way to get started with Diploi. It allows you to quickly launch a new application online without the need to create a repository or configure anything. You can start a deployment right away from [our homepage](https://diploi.com/#StackBuilder). 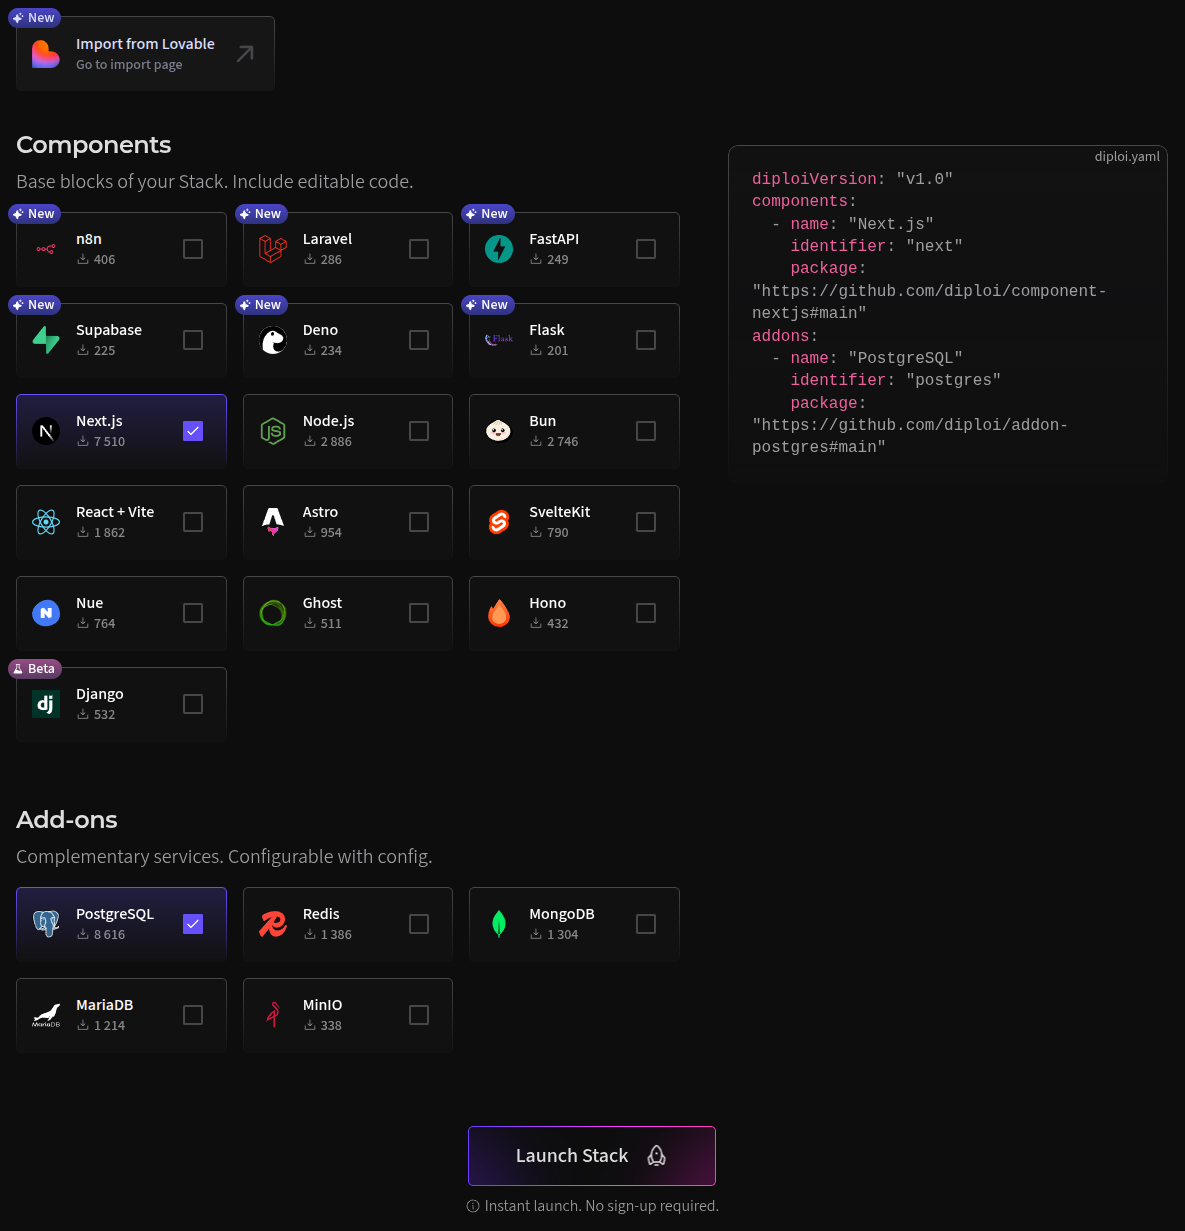 In the stack builder, you can can choose the components and add-ons you want to have in your deployment, and that’s it! You can click “**Launch stack**” and your deployment will be ready in about 30 seconds. 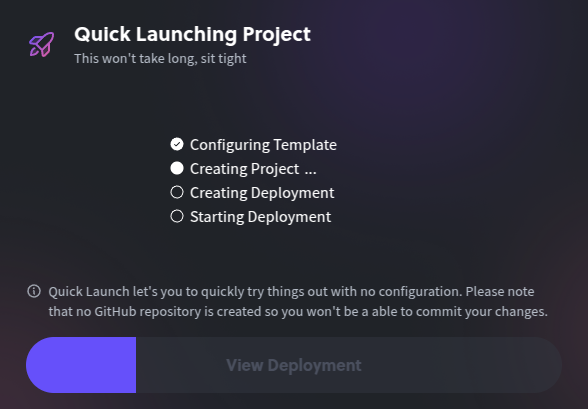 Once the launch is complete, you will be able to connect to the remote server and your deployment will be accessible online with https. 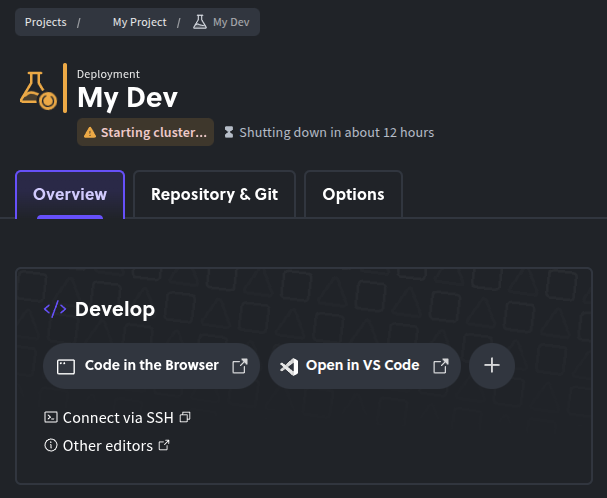 ### Using Diploi for Production To get started using Diploi for Production apps, you need to create a Diploi account. Since Diploi is tightly integrated with GitHub, you will need a GitHub account to be able to register. To register, go to [console.diploi.com](https://console.diploi.com) and authenticate using your GitHub account. *** For more information on how to use Diploi, check out the following guides: * [Creating a Project](/deploying/creating-a-project/) * [Creating a Deployment](/deploying/creating-a-deployment/)
# Diploi Project Architecture
> A high level explanation of how Diploi works and how projects are setup.
## Diploi in a Nutshell Diploi’s mission is to make deployment into a process that you do not need to think about. Our goal is for you to just focus on the code that defines your app, without worrying about SSL certificates, setting up CI/CD pipelines and other commonly cursed devops demons. We made it possible with a simple architecture to define a new application. In Diploi, you start by first creating a **Project**. A project is the basic building block of your new application. Inside your **Project**, you define the elements that will power your application. There are two types of elements that are part of your **Project**, * **Components**, which are the elements that will be exposed for users to access them. These can be frontend, backend or fullstack, and inside of a project you can have multiple components running at the same time as a monorepo. * **Add-ons**, which are elements that will be accessible to your components only. These can be databases, cache servers, message queues, etc. ### Project Structure To make the following explanations clearer, let’s assume we just created a Project with Bun for the backend and React+vite for the frontend, Redis for caching and PostgreSQL as our app’s database.  ### Deployment Structure After you create a **Project**, you can create **Deployments** which will belong to the **Project**. A deployment creates a managed kubernetes cluster that will your run your application’s Components and Add-ons.  The deployment’s cluster runs the Diploi core process in charge of communicating with our main server, along with Docker containers for each component and add-on that your project has inside independent pods inside the cluster.  So when you launch deployments, you are creating a new cluster for your project, so you can have different deployments for multiple stages of your application.  *** For an detailed walkthrough about how Diploi manages your Projects and Deployments, check [the technical deep dive](/reference/technical-deep-dive). If anything was unclear or you need help, talk with us on [Discord](https://discord.gg/vvgQxVjC8G) or [contact us](mailto:hello@diploi.com).
# Deployment Lifecycle
> A deployment is a full instance of your application.
## Creating a Deployment To start creating a deployment, you must first [create a project](/deploying/creating-a-deployment/). Once you have a project, you can start creating new deployments. In the next steps, we will walkthrough all the properties that can be set up when creating a deployment. ### General Within the general settings of your new deployment, you can define the name of the deployment and its stage. 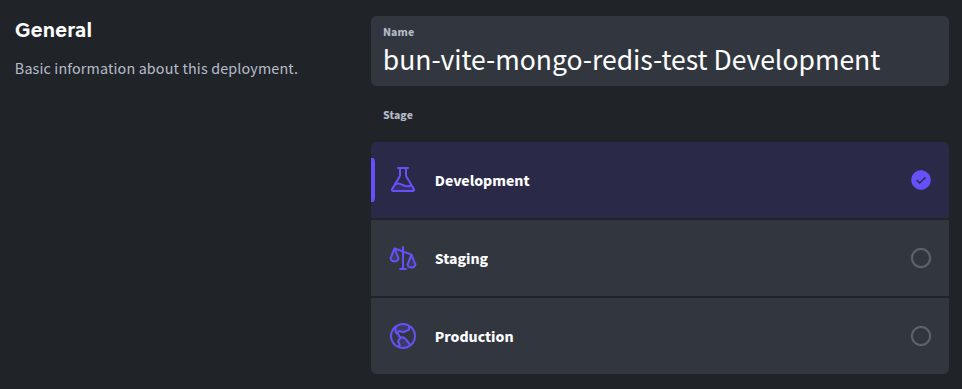 #### Deployment Name This will identify the internal name of your deployment within your Diploi project. You can change the name of a deployment at any time. Changes to the project name will not affect your deployment, project, repository or dependencies. #### Deployment Stage In Diploi, you have three stages that you can assign to your deployments: ##### Development Development deployments enable remote development and let your application be served online development. It offers a browser IDE that can be used for remote development and also allows you to SSH into the environment using VSCode. Development deployments often utilize hot module reloading (HMR) or similar techniques to enable quick code updates without server restarts. When using this stage, your code is cloned directly from GitHub without going through the build process. ##### Staging Staging deployments are used for testing and quality assurance purposes. They run a build version of your application, exactly as your Production deployments do but as an independent deployment that would not affect your Production deployment. ##### Production Production deployments host the build version of your application and it is intended to be the version of your application that your users will have access to. ### Size You must choose the appropriate size for your application. You can update the size of your deployment directly from the Options tab of your deployment. \- **S** - 2 vCPUs and 4 GB of ram - **0,026 €/hour** \- **M** - 2 vCPUs and 8 GB of ram - **0,048 €/hour** \- **L** - 4 vCPUs and 16 GB of ram - **0,089 €/hour** \- **XL** - 8 vCPUs and 32 GB of ram - **0,182 €/hour** ### Repository In this section you will be able to define the branch that your deployment will use. You can change the branch source for your deployment from the ***Repository & Git*** tab of your deployment. 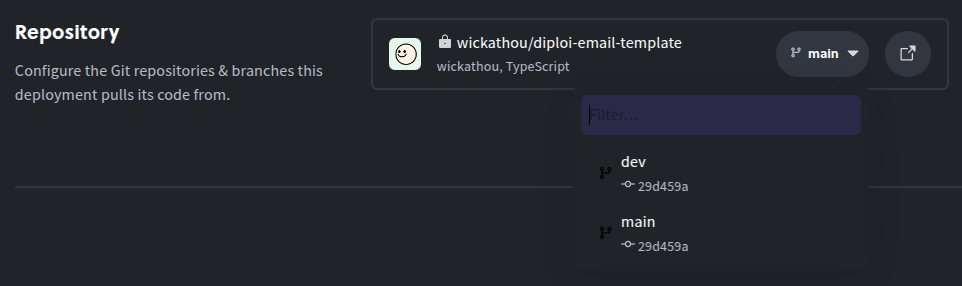 ### Component and Add-on Settings Depending on your project’s components and add-ons, you might be able to make changes to the configuration, changes in this section will not affect other deployments or your project’s default configuration. 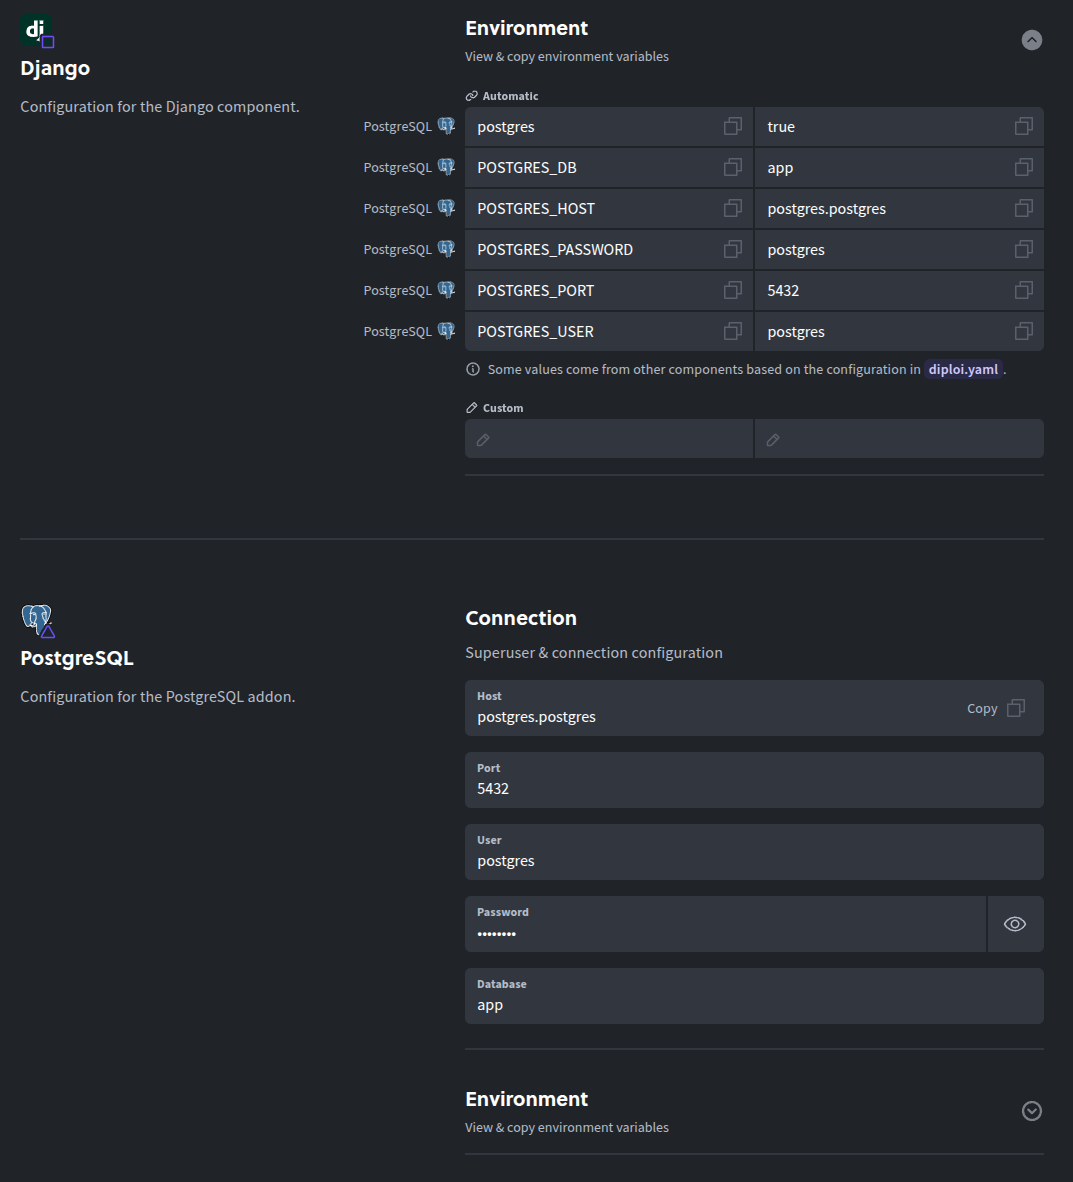 ## Managing a Deployment Once you have created a deployment inside a project, you can access your deployment’s settings from the project page. 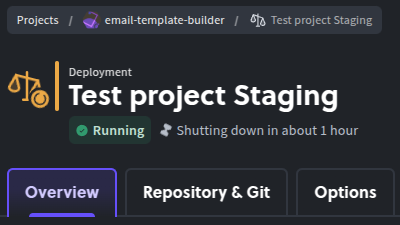 ### Overview From the overview tab, you can see the status of your deployment, view the logs for each component and add-on running and resources used. The overview tab is divided in three core sections: #### Develop Section Only available on Development deployments In this section, you can get the SSH connection string to your development environment and access to the remote IDE environment.  ##### Remote Development Diploi supports remote development by using the remote development capabilities of eg. Visual Studio Code, but any editor that supports editing using an SSH connection will work. For more details, please see the [Remote Development](/building/remote-development/) guide. ##### Connecting using SSH Once you have created a deployment, look for the “Connect via SSH” command on the “Overview” tab. This command can be copied to your terminal of choice to open an SSH connection to the deployment. *** #### Status tree Where you can see the resources your deployment is using and the status of containers that are part of your deployment, logs, SSH connections for each container and their endpoints of all components and add-ons available on your application. 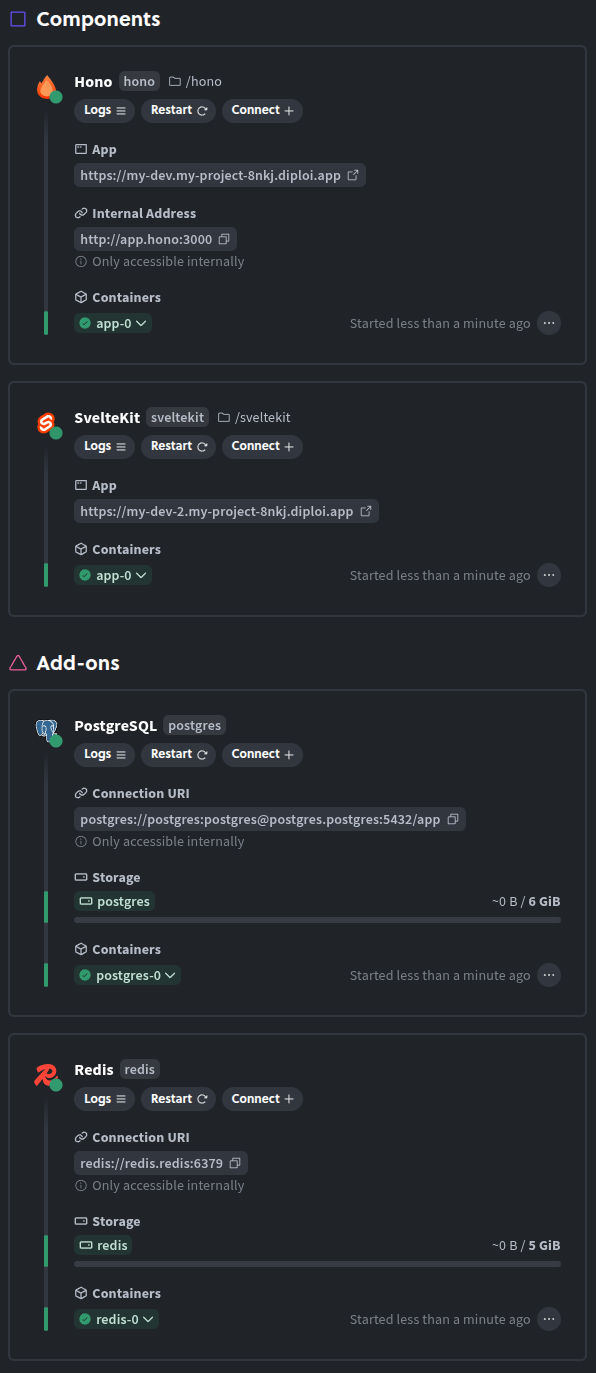 All public facing URL endpoints that your applications expose have SSL encryption by default. ##### Deployment Setup Status In this section you can visualize the status of each component and add-on that defines your deployment. ##### Status After a deployment is started you can check its status from the Deployments Overview page. Diploi assigns a color to indicate the overall state of the deployment components * **Green** - the deployment is working correctly * **Yellow** - there is some issue but the deployment still runs * **Red** - there is some bigger issue that needs to be addressed ##### Logs For each container used by your components and add-ons, you can review the logs by clicking on the “logs” button. 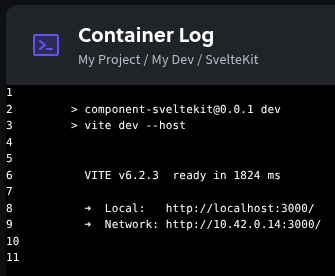 *** #### Deployment resources Here you can view how your application is using the resources available to the deployment. 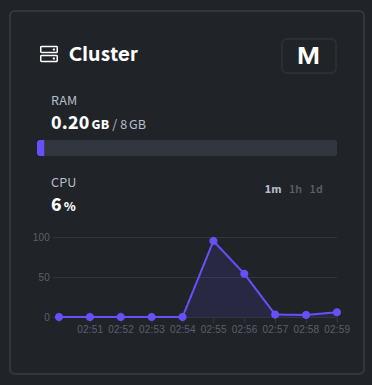 Here you can visualize the overall resource usage of your deployment. You can adjust the timeframe to show 1 minute, 1 hour or 1 day. *** *** ### Repository & Git Only available on project deployments that are linked to a repository From this tab, you can choose the branch that your deployment will be using as its source. When you push new changes to your selected branch, a GitHub action will be run in your repository, which creates an updated build of your application and it then updates the environment of your deployment. In this tab, you can also change the attribution of updates to the environment, which by default is attributed to the GitHub account that created the project. 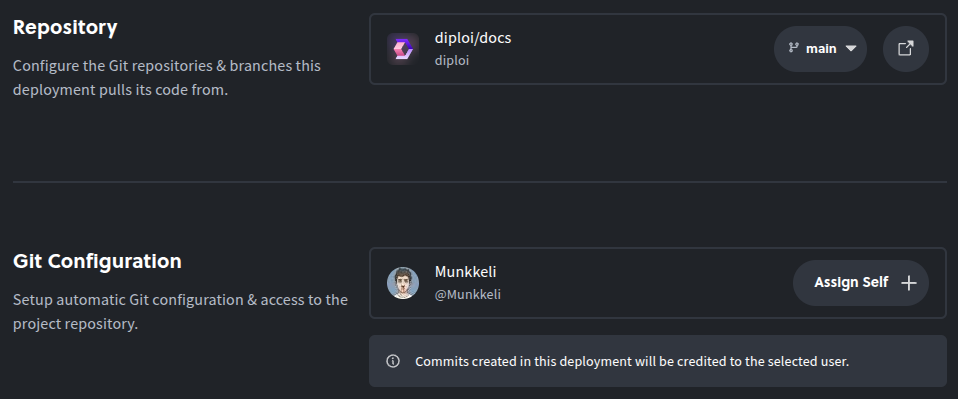 ### Deployment Options From here you can update the deployment’s name, change the size of your deployment, assign a custom domain to the public endpoints exposed by your deployment, update the environment variables used by each component and add-on in your deployment or delete your deployment. #### Updating the Name You can update the deployment’s name used inside of your project. 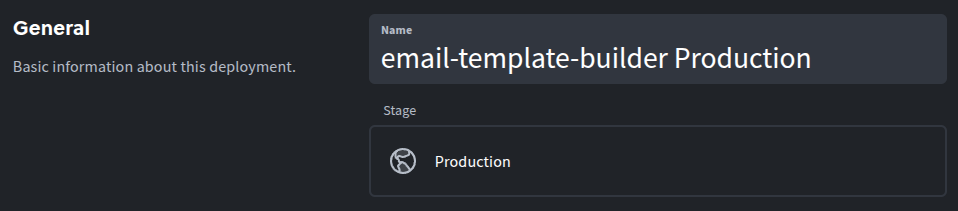 #### Machine Size You can change the size of the deployment machine that your deployment uses, by first disabling the deployment and then choosing a different size.  #### Endpoint Settings Diploi will by default create a public endpoint for your application and generate SSL certificates for the public endpoints. You can customize the auto-generated domains or if you prefer, you can assign a custom domain. For a more detailed explanation, check the [custom domain guide](/deploying/custom-domain/). 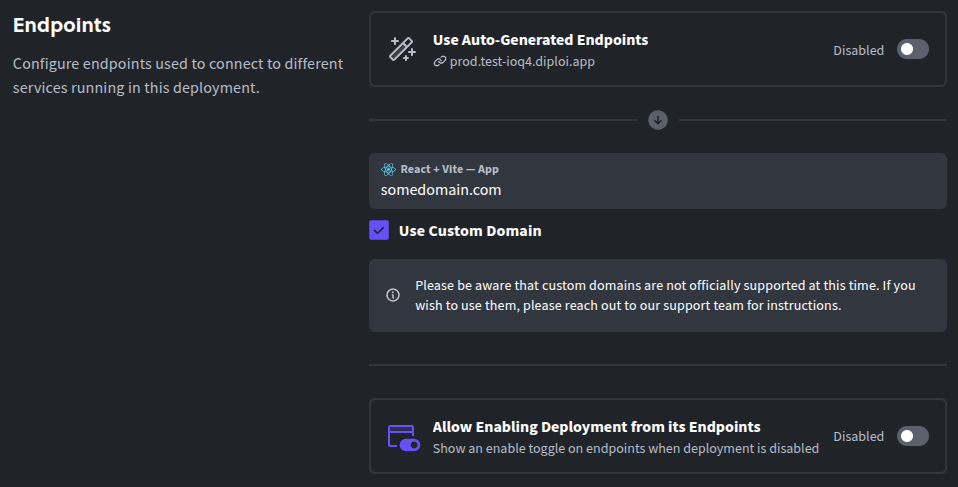 ##### Using a Custom Domain If you want to use a custom domain all you need to do is: 1. Access your domain’s DNS records in your domain host. 2. Create a new CNAME record, pointing to `edge.diploi.com` 3. Make sure to assign a specific name in the CNAME record, as wildcard domains are not fully supported yet. For example, if you use GoDaddy domains, if you want to use a subdomain like `custom.mydomain.com` your DNS configuration would look like this: 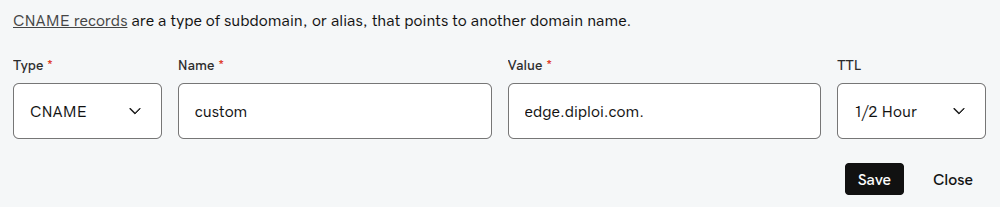 #### Managing Environment Variables You can customize the environment variables that each of your components and add-ons use. Some variables are automatically generated from your add-ons into your components. 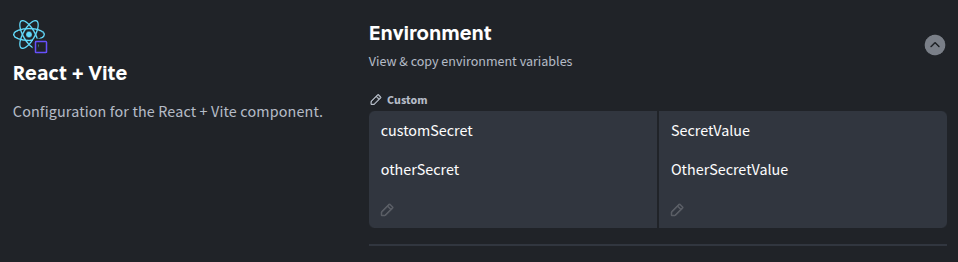 ## Deleting a Deployment When you don’t need a deployment anymore, you can delete it by looking for the button ***Delete deployment*** at the bottom of the Options tab. Be aware that this will permanently delete all data stored (such as code, databases etc.) associated with the instance. 
# Deployments Explained
> A deployment is a full instance of your application.
## What is a Diploi Deployment? In Diploi, a deployment is a full instance of your application, including databases and other services. It also includes storage and current code changes you are working on. In simple terms, a deployment is a cluster that runs your code. *** ## Deployment Types Deployments in Diploi are divided into two general categories, dynamic development deployments and built deployments. ### Dynamic development deployments In Diploi are deployments used for remote development, these have persistent storage for your code so that code changes will stay even if your deployment restarts or shutdown. ### Build deployments In Diploi can be ***Staging*** or ***Production deployments*** and their cluster instances will run the production build of your application.
# diploi.yaml Explained
> A deployment is a full instance of your application.
The `diploi.yaml` file at the root of a Diploi repository is the **Infrastructure as Code (IaC)** configuration file Diploi uses to build the infrastructure for a deployment.\ Our component-based model allows for easy configuration of stacks without making the config overly verbose. The more detailed config for a component, such as HELM charts and other setup files, are housed in dedicated GitHub repositories maintained by the component owners. ```yaml diploiVersion: v1.0 components: - name: Next.js identifier: next package: https://github.com/diploi/component-nextjs#main env: include: - * - name: Bun identifier: bun package: https://github.com/diploi/component-bun#main env: include: - postgres.* - name: Node.js identifier: node package: https://github.com/diploi/component-nodejs#main env: include: - postgres.POSTGRES_USER:DB_USER addons: - name: PostgreSQL identifier: postgres package: https://github.com/diploi/addon-postgres#main ``` ## `components` and `addons` The list of components and addons to be included in a project. Everything in this list can be edited and your infrastucture will adapt. ### `name` The display name for a component. ### `identifier` An internal identifier for a component. **This has to be unique.**\ The identifier is used as the internal hostname for a component, and as the folder name where the component files are located. Caution The component identifier has to match the folder name it is stored in. If you change one, make sure to change the other too. ### `package` The URL for the package repository. Version comes after the hashtag `#` symbol. Version can be a Git tag or branch reference. ### `env` ENV values from other components aren’t available by default, but can be configured here. Importing an ENV variable means making it available for processes inside of a component. ```yaml env: include: # Imports every ENV value from every component - * # Imports all ENV values from a component with the `postgres` identifier - postgres.* # Imports all ENV values that start with `POSTGRES_` from a component with the `postgres` identifier - postgres.POSTGRES_* # Imports all ENV values from all components where an identifier starts with `post` - `post*` # Imports the `POSTGRES_USER` ENV value from a component with the `postgres` identifier - postgres.POSTGRES_USER # Imports the `POSTGRES_USER` ENV value from a component with the `postgres` identifier and renames it to `DB_USER` - postgres.POSTGRES_USER:DB_USER ``` #### `import` A list of ENV values available for processes inside of this component. You can use wildcards when importing values. * `*` * Imports every ENV value from every component * `postgres.*` * Imports all ENV values from a component with the `postgres` identifier * `postgres.POSTGRES_*` * Imports all ENV values that start with `POSTGRES_` from a component with the `postgres` identifier * `post*` * Imports all ENV values from all components where an identifier starts with `post` * `postgres.POSTGRES_USER` * Imports the `POSTGRES_USER` ENV value from a component with the `postgres` identifier You can remap individual ENV values while importing them * `postgres.POSTGRES_USER:DB_USER` * Imports the `POSTGRES_USER` ENV value from a component with the `postgres` identifier and renames it to `DB_USER`
# Glossary
> Terms used in DevOps and Web Development.
This glossary clarifies the common terms you’ll find while reviewing our docs, managing deployments, and operating production services on Diploi. [A](#a) · [B](#b) · [C](#c) · [D](#d) · [E](#e) · [F](#f) · [G](#g) · [H](#h) · [I](#i) · [J](#j) · [K](#k) · [L](#l) · [M](#m) · [N](#n) · [O](#o) · [P](#p) · [Q](#q) · [R](#r) · [S](#s) · [T](#t) · [U](#u) · [V](#v) · [W](#w) · [X](#x) · [Y](#y) · [Z](#z) *** ## A ### Add-on A managed service that can run databases, caches, or message brokers. In Diploi, users can attach add-ons to projects within the private network of the project and exposes credentials to components through the console. *See also:* [Learn more about add-ons](/building/add-ons/), [Component](#component) ### Access Token A short-lived credential that grants programmatic access to APIs or CLIs without sharing a human password. *See also:* [Project](#project), [User Role](#user-role) ### Astro A static-first web framework built for content-driven sites with selective hydration. *See also:* [More about components](/building/components/), [Component](#component) ### Audit Log A chronological record of operational and security events across your systems. *See also:* [Project](#project), [Owner Role](#owner-role) *** ## B ### Backup Policy A set of rules defining how and when data snapshots are retained. *See also:* [Add-on](#add-on), [Failover Plan](#failover-plan) ### Base Image A foundational filesystem layer used to build container images. Diploi creates and maintains base images for components and add-ons to ensure consistent environments. *See also:* [Container Image](#container-image) ### Build Pipeline An automated sequence that compiles, tests, and packages your code. Diploi automatically generates a pipeline, through GitHub Actions when a new project is created. *See also:* [CI/CD](#ci-cd), [GitHub Actions](#github-actions) ### Branch Protection Repository rules that restrict who can push or merge into specific branches. *See also:* [Repository Launch](#repository-launch), [Deployment Stage (Development/Staging/Production)](#deployment-stage-developmentstagingproduction) *** ## C ### Component In Diploi, Components are services that execute code programmatically using a specific framework or runtime. Components are run as pods within an app cluster deployment. *See also:* [More about components](/building/components/), [Stack](#stack), [Pod](#pod), [Cluster](#cluster) ### Container Image An immutable package containing application code, runtime, and dependencies. Diploi builds container images via GitHub Actions and stores them in an image registry. *See also:* [Image Registry](#image-registry), [GitHub Actions](#github-actions) ### CI/CD Continuous integration and delivery practices that automate testing and deployment. Diploi creates a default CI/CD workflows that run on GitHub Actions for all projects hosted. *See also:* [Learn more about the Deployment lifecycle in Diploi](/reference/deployments/deployment-lifecycle/), [Deployment Stage (Development/Staging/Production)](#deployment-stage-developmentstagingproduction) ### CNAME A DNS record that aliases one domain name to another host. In Diploi, custom domains use a CNAME pointing to `edge.diploi.com` for Diploi-managed endpoints. *See also:* [How to add a custom domain](/deploying/custom-domain/), [DNS](#dns) ### Custom Domain A human-friendly address that you configure to serve your application. Diploi provisions certificates and routing once you map a custom domain to the deployment’s endpoint. *See also:* [CNAME](#cname), [SSL/TLS](#ssltls) ### Cluster A coordinated set of compute resources managed by Kubernetes. In Diploi, each deployment runs on its own single-node Kubernetes cluster managed by Diploi. *See also:* [Kubernetes](#kubernetes), [Single-node Kubernetes Cluster](#single-node-kubernetes-cluster) *** ## D ### Deployment A released instance of your application that users can access. A deployment contains every component, add-on, and environment for a project stage. In Diploi, the components that are part of a deployment are always accessible online via its endpoints. *See also:* [Learn more about the Deployment lifecycle in Diploi](/reference/deployments/deployment-lifecycle/), [Status Tree](#status-tree), [Endpoints](#endpoint) ### Deployment Stage (Development/Staging/Production) A lifecycle progression that separates code promotion into Development, Staging, and Production environments. *See also:* [Deployment](#deployment), [Repository Launch](#repository-launch) ### Development Container Also known as Dev Container, is a container configured to run a development environment to work with a specific codebase. It can be configured with Docker or config files. In Diploi, Dev Containers are used to allow users to connect to code directly from their browser or connecting to the dev container via SSH with their local IDE. ### diploi.yaml A declarative manifest that defines project components, add-ons, environments, and automation. In Diploi, `diploi.yaml` drives provisioning, stack composition, and env import rules for every deployment. *See also:* [More about diploi.yaml](/reference/diploi-yaml/), [Stack](#stack) ### DNS The system that translates domain names into IP addresses. *See also:* [CNAME](#cname), [Endpoint](#endpoint) ### Drift Detection The process of spotting differences between declared infrastructure and the actual runtime state. *See also:* [Status Tree](#status-tree), [Deployment](#deployment) *** ## E ### Endpoint A network-accessible URL or socket where a service listens for requests. Diploi assigns endpoints per component and deployment, with the option of assigning a custom domain to each component’s endpoint. *See also:* [Deployment Stage (Development/Staging/Production)](#deployment-stage-developmentstagingproduction), [Custom Domain](#custom-domain) ### Environment Variable Import Also known as ENV Variable Import, it is a configuration pattern that pulls environment values from an external source into your application. In Diploi, ENV variables can be shared between components and add-ons by declaring it on the `diploi.yaml` file. *See also:* [More about diploi.yaml](/reference/diploi-yaml/), [Secrets Manager](#secrets-manager) ### Error Budget The acceptable amount of downtime or failures within a service-level objective. *See also:* [Metric](#metric), [Status Tree](#status-tree) *** ## F ### Feature Flag A runtime switch that toggles features on or off without redeploying. *See also:* [Environment Variable Import](#environment-variable-import), [Deployment Stage (Development/Staging/Production)](#deployment-stage-developmentstagingproduction) ### Failover Plan A documented strategy for restoring service after infrastructure failure. *See also:* [Single-node Kubernetes Cluster](#single-node-kubernetes-cluster), [Zero Downtime](#zero-downtime) ### Front-end Component A component dedicated to serving web assets or UI logic. In Diploi, front-end components supported include frameworks like Astro, React and SvelteKit. *See also:* [Component](#component) *** ## G ### GitHub Actions GitHub’s automation platform for running workflows triggered by repository events. *See also:* [CI/CD](#ci-cd), [Repository Launch](#repository-launch), [More about GitHub Actions](https://docs.github.com/en/actions) ### Git Repository A version-controlled store containing your project’s source history. *See also:* [Project](#project), [GitHub Actions](#github-actions) ### Global Configuration Shared settings applied across multiple components or environments. In Diploi, the global configuration for a project lives in `diploi.yaml`. *See also:* [More about diploi.yaml](/reference/diploi-yaml/), [Stack](#stack) *** ## H ### Helm Chart A templated bundle of Kubernetes manifests used to install applications. In Diploi, Helm charts are used along with `diploi.yaml` files to build and host deployments for a project. *See also:* [Explore Diploi’s technical deep dive](/reference/technical-deep-dive/), [Kubernetes](#kubernetes) ### Health Check A programmatic test that inspects the current state of a service, to determine if it is ready, shutdown or in a error state. *See also:* [Component](#component), [Status Tree](#status-tree) ### High Availability An architecture that tolerates failures without noticeable downtime. *See also:* [Single-node Kubernetes Cluster](#single-node-kubernetes-cluster), [Failover Plan](#failover-plan) *** ## I ### Identifier A unique, stable value used to reference a resource or configuration entry. Identifiers are used in the `diploi.yaml` file, to name components and add-ons. *See also:* [Stack](#stack), [More about diploi.yaml](/reference/diploi-yaml/) ### Image Registry A service that stores and distributes container images. *See also:* [Container Image](#container-image), [CI/CD](#ci-cd) ### Infrastructure Secret Sensitive credentials required to provision or connect infrastructure. *See also:* [Environment Variable Import](#environment-variable-import), [Secrets Manager](#secrets-manager) *** ## J ### Job Runner A worker process designed for asynchronous or scheduled tasks. *See also:* [Component](#component), [Stack](#stack) ### JSON Schema A specification describing the structure and validation rules for JSON documents. *See also:* [diploi.yaml](#diploiyaml), [More about diploi.yaml](/reference/diploi-yaml/) *** ## K ### Kubernetes An orchestration platform for deploying and managing containerized workloads. Diploi provisions dedicated Kubernetes clusters per deployment and manages them. *See also:* [Explore Diploi’s technical deep dive](/reference/technical-deep-dive/), [Helm Chart](#helm-chart) ### Kubeconfig A configuration file that stores cluster access credentials and contexts. *See also:* [Kubernetes](#kubernetes), [User Role](#user-role) ### Key Rotation Regularly replacing secrets or cryptographic keys to reduce compromise risk. *See also:* [Infrastructure Secret](#infrastructure-secret), [Environment Variable Import](#environment-variable-import) *** ## L ### Load Balancer A network component that distributes traffic across service instances. *See also:* [Endpoint](#endpoint), [Kubernetes](#kubernetes) ### Log Stream A continuous feed of application or system logs. in Diploi, you can access the log stream of each component and add-on of a active deployment from the deployment dashboard. *See also:* [Component](#component), [Remote Development](#remote-development) ### Lifecycle Hook A script or automation triggered at a specific phase in the deployment lifecycle. *See also:* [GitHub Actions](#github-actions), [Deployment Stage (Development/Staging/Production)](#deployment-stage-developmentstagingproduction) *** ## M ### Monorepo A repository that stores multiple services or libraries in a single codebase. Diploi scaffolds projects as monorepos so components share tooling while deploying independently as containers. *See also:* [Project](#project), [Component](#component) ### Managed Service An infrastructure capability operated by a provider instead of your team. Diploi-managed services include cluster provisioning, certificates, and deployment lifecycle. *See also:* [Add-on](#add-on), [Single-node Kubernetes Cluster](#single-node-kubernetes-cluster) ### Metric A measurable value that helps observe system performance. Diploi shows the CPU load and memory usage, alongside health status signals for components and add-ons. *See also:* [Status Tree](#status-tree), [Observability Stack](#observability-stack) *** ## N ### Namespace A Kubernetes partition that scopes resources within a cluster. In Diploi, each project deployment lives in its own namespace to isolate workloads. *See also:* [Kubernetes](#kubernetes), [Project](#project) ### Network Policy Rules that control how pods communicate within a cluster. Diploi applies restrictive network policy, so add-ons in a deployment are only exposed to the components that belong to the same deployment. *See also:* [Add-on](#add-on), [Component](#component) ### Node A compute instance that runs Kubernetes pods. *See also:* [Single-node Kubernetes Cluster](#single-node-kubernetes-cluster), [Kubernetes](#kubernetes) *** ## O ### Observability Stack The tooling used to collect logs, metrics, and traces. *See also:* [Metric](#metric), [Add-on](#add-on) ### Owner Role A permission level with full administrative control over a project. *See also:* [Project](#project), [User Role](#user-role) *** ## P ### Package (Component Package URL) A reference to a component’s template package hosted at a URL. *See also:* [More about diploi.yaml](/reference/diploi-yaml/), [Component](#component) ### Parent Domain The apex domain under which subdomains are delegated. *See also:* [Custom Domain](#custom-domain), [DNS](#dns) ### Project The top-level grouping of components, add-ons, and environments for an application. In Diploi, a project governs repositories, deployments, permissions, and billing across all stages. *See also:* [more about Project Lifecycle](/reference/projects/project-lifecycle/), [Stack](#stack) ### Pod The smallest deployable unit in Kubernetes containing one or more containers. Diploi hosts each component and add-on as pods, managed by Helm chart inside the deployment. *See also:* [Kubernetes](#kubernetes), [Helm Chart](#helm-chart) *** ## Q ### Queue Worker A service dedicated to processing asynchronous tasks from a queue. *See also:* [Component](#component), [Job Runner](#job-runner) *** ## R ### Remote Development A way to develop applications and sevices using cloud-hosted environments to code, instead of developing locally. In Diploi, users get a Remote Development environment that uses Dev Containers to enable remote access from Cursor and VS Code, using SSH, or directly from the browser, using Diploi’s cloud IDE. *See also:* [Deployment Stage (Development/Staging/Production)](#deployment-stage-developmentstagingproduction), [Endpoint](#endpoint), [Dev Container](#development-container) ### Repository Launch In Diploi, it is the process of connecting a repository and enabling automated deployments for it. *See also:* [Project](#project), [CI/CD](#ci-cd) ### Resource Quota Limits that cap CPU, memory, or storage usage for workloads. *See also:* [Component](#component), [Single-node Kubernetes Cluster](#single-node-kubernetes-cluster) ### Rollback Restoring a system to a previous known-good state. *See also:* [Container Image](#container-image), [Deployment](#deployment) *** ## S ### Stack A set of components and add-ons that are part of a project. *See also:* [Project](#project), [Component](#component) ### Secrets Manager A system for securely storing and distributing sensitive values. *See also:* [Environment Variable Import](#environment-variable-import), [Infrastructure Secret](#infrastructure-secret) ### Service Account A machine identity used by services to authenticate with APIs. *See also:* [Environment Variable Import](#environment-variable-import), [Identifier](#identifier) ### Single-node Kubernetes Cluster A Kubernetes environment where control plane and workloads run on one node. In Diploi, every deployment operates as a single-node Kubernetes cluster. *See also:* [Cluster](#cluster), [Explore Diploi’s technical deep dive](/reference/technical-deep-dive/) ### SSL/TLS Protocols that encrypt data in transit between clients and servers. In Diploi, all SSL/TLS certificates are issued and renewed automatically for all endpoints exposed by a deployment. *See also:* [Custom Domain](#custom-domain), [Endpoint](#endpoint) ### Status Tree A hierarchical view that summarizes the health of related resources. *See also:* [Deployment](#deployment), [Metric](#metric) *** ## T ### Template Project A preconfigured project layout that accelerates new application setups. *See also:* [Package (Component Package URL)](#package-component-package-url) ### Test Pipeline Automated checks that validate code before deployment. *See also:* [Build Pipeline](#build-pipeline), [CI/CD](#ci-cd) *** ## U ### Upgrade Window A scheduled period reserved for applying updates. *See also:* [Failover Plan](#failover-plan), [Zero Downtime](#zero-downtime) ### User Role A permission level that defines what actions a user can perform. *See also:* [Owner Role](#owner-role), [Project](#project) *** ## V ### Version Pinning Is a way to locking dependencies or images to specific versions using package config files. *See also:* [Package (Component Package URL)](#package-component-package-url), [Base Image](#base-image) ### Volume Within the context of Infrastructure-as-Code, a Volume is a storage unit, that can be persistent or shared, used to provide storage to containers. In Diploi, Volumes are persistent, and are provisioned dynamically based on the storage required by a deployment. *See also:* [Helm Chart](#helm-chart), [Component](#component) *** ## W ### Workspace The collaborative area where teams plan, build, and deploy applications. A workspace groups multiple projects and members under one organizational umbrella. *See also:* [Project](#project), [User Role](#user-role) ### Webhook An HTTP callback triggered by events to notify external systems. In Diploi, you can setup custom Webhooks using any of the backend or fullstack components available, eg. FastAPI, Bun, Node. *See also:* [Repository Launch](#repository-launch), [Deployment](#deployment) *** ## X ### X-Forwarded-For Header A proxy header that preserves the original client IP address. *See also:* [Endpoint](#endpoint), [Load Balancer](#load-balancer) *** ## Y ### YAML Schema Rules that describe the allowed structure of YAML files. *See also:* [JSON Schema](#json-schema), [More about diploi.yaml](/reference/diploi-yaml/) *** ## Z ### Zero Downtime Deployments that avoid noticeable service interruption.. *See also:* [Helm Chart](#helm-chart), [Failover Plan](#failover-plan)
# Project Lifecycle
> How projects are created, managed and deleted.
## Creating a Project This is the first step to deploy a new application using Diploi. To create a project you must: 1. Select the stack of components and add-ons that your application will be using 2. Choose between creating a new repository to store your application’s code or launching without a repository associated for testing purposes Every project is started from the set of components and add-ons you choose and this defines the structure of your project. ### Components You can think of components as the application layer of your project. In Diploi you can have multiple options available to define your application, which you can mix as you wish. #### Components available  **n8n** new  **Laravel** new  **FastAPI** new  **Flask** new  **Deno** new  **Supabase** new  **Next.js**  **Node.js**  **Bun**  **React + Vite**  **Astro**  **SvelteKit**  **Nue**  **Ghost**  **Hono**  **Lovable**  **Django** beta ### Add-ons Add-ons provide services used by your application. In general, add-ons in Diploi are services that do not require direct development work, which can be services like databases, analytics services, CMS dashboards, etc. #### Add-ons available  **PostgreSQL**  **Redis**  **MongoDB**  **MariaDB**  **MinIO** *** ### Previewing your Project In this section, you can see a preview of your monorepo folder structure at root level.  ### Choosing Between Creating a Project with or without a Repository A **Project with a repository** is the default way to set up a project, Diploi bootstraps a new GitHub repository for you and generates a scaffold for your app based on the Stack you choose. additionally Diploi creates a CI/CD pipeline so changes can be persisted across multiple environments and allows your project to be launch in Staging and Production. A **Project without a repository** used when you want to test a Stack or you want to run a simple scripts and apps online without a repository. Caution Once you choose between using a new repository or launching without a repository, you will not be able to change the repository or add a repository. *** ## Managing a Project After creating a project, you will be able to create new deployments and modify the options of the project.  ### Project Deployments You will be able to create deployments. Each deployment represents a cluster that serves your application online. For a deeper dive on deployments, check the article about [Deployments](/reference/deployments/deployment). ### Project Options In this tab you can view and edit properties of your project. #### General From here you can update the project’s name inside Diploi. When you launch new deployments, the new deployment’s name will start by using the project’s name.  #### Parent Domain By default, Diploi generates a domain for your application. The basic structure of a generated domain uses the following logic: ```plaintext ..diploi.app ```  ## Deleting a Project When you no longer need a Project you can delete it by first deleting all deployments within the project and the going to the “options” tab of your projects and look for the actions sections, to delete the project click on the “delete project” button. 
# Projects Explained
> A project contains the deployments of your application.
## What is a Diploi Project? A Diploi project contains the deployments of your application. A typical setup could be one deployment for production, one for staging and perhaps one development instance per active developer. A project is defined by components and add-ons. A project also connects to a GitHub repository and contains common settings and environment variables. *** ## Project types ### Project with Repository When you choose to create a new project with a new repository, you will be able to launch a new deployments from different branches of your repository, allowing you to have different environments online at the same time without having to configure servers manually.  By default, when you create a new project, a development deployment will be started, which you can use to start developing your application right away and will be active for 12 hours. This development deployment will use your repository’s default branch main branch as its source. ### Project Without a Repository When starting a project without a repository, you get a development environment that you can use to test new technologies, simple scripts, cron jobs, or just to try out Diploi without the need to create a repository. Caution When you start a project a without a repository, **you cannot add a repository later**. Which is why we do not recommend it for projects meant for production. Caution **Projects without a repository** are **not intended for production**, as your code will only exist on the deployment launched, and changes will not be persisted to other deployments you launch within the project. You can create a project without a repository by clicking on the “**Launch Without a Repository**” option inside the “GitHub Repository” section, when creating a new project.  *** If anything was unclear or you need help, talk with us on [Discord](https://discord.gg/vvgQxVjC8G) or [contact us](mailto:hello@diploi.com).
# Technical Deep Dive
> How it works.
People often ask us if going with Diploi will result in vendor lock-in. The short answer is **no**, let’s walkthrough how Diploi works under the hood. To begin with, when you start a deployment, Diploi will internally launch a private Kubernetes cluster for your deployment. When the cluster starts it will launch all services you have selected as individual containers in the cluster and after that, through Kubernetes you are able to monitor and control the cluster until you close it (eg. by pausing or deleting your deployment). #### Stack, Components and Add-ons But how does Diploi know what services to launch? The answer is your stack. Every deployment you launch, uses your selected stack to describe the services, repositories, hosts, storage, etc. that your cluster must use. The kubernetes setup is handled with standard helm charts. In fact all the specifications for our stack building logic are available on GitHub at . In the future we want you to be able to build and maintain your own components and add-ons, allowing for an endless possibility of services to be mixed and matched. If you would like to help us or want custom features to use Diploi, connect with us on [Discord](https://discord.gg/vvgQxVjC8G) or [by email](mailto:hello@diploi.com). #### Builds, CI/CD and Images With Diploi you don’t need to setup build pipelines, host images of your containers or think about CI/CD, but how does this actually work? The normal way of starting a Diploi project is to let Diploi create the GitHub repository for you. In that process Diploi will also set up GitHub actions that will handle image builds when pushing to that repository. These images are pushed to an image repository hosted by us in order to make images as fast as possible when launching deployments. If you want to make modifications to the application container you have full power to control the image created in your own GitHub repository, so you are not restricted to the images dockerfiles we provide as starting points. In order to make remote development, deployment statuses, etc. work there are certain things that need to be in place. We will provide more documentation on how these things work as the Diploi service matures. #### So What About That Vendor Lock-in Diploi runs on a standard kubernetes setup, with publicly available helm charts and Dockerfiles for the containers. Using all this together with the code you host yourself on GitHub makes it easy for you to migrate your project to any cloud provider with kubernetes support. If you want assistance migrating out of Diploi, you can connect with us on [Discord](https://discord.gg/vvgQxVjC8G) or [by email](mailto:hello@diploi.com).
# Roadmap
> Feature roadmap and upcoming improvements for Diploi
Here is a short list with item we are currently working on. ### Improved project import Basic support for importing and running existing GitHub repositories was recently added. We now support **Lovable** and some basic **NodeJS** projects. The idea is to gradually expand this support to be able to run as many types of tech stacks as possible, preferably without any configuration. Expect improvements on a monthly basis. Just running any kind of existing repository is a little more tricky for us than eg. Railway or Netlify since we also need to run the system in development preferrably with hot-reloading and all other development specialties working. ### Custom components Custom components will allow power users to create and fine-tune their own components in order to run technologies not currently supported by Diploi. Dipli components and add-ons are based on Helm charts, so this will provide a lot of flexibility. ### Inline components We intend to make it possible to include a component’s configuration directly in your source repository, allowing for tight control on exactly how the cluster is configured. This will also be useful for component editors. ### Vertical scaling This will make it possible to use Diploi for applications with more traffic than a single-node cluster can handle, it will also improve availability and reliability. ### Community Requests We’re tracking feature requests from our community. Here are the most requested features: 1. **Multi-language support** - Support for more programming languages 2. **Database migrations** - Automated database schema management 3. **CI/CD integration** - Built-in testing and deployment pipelines 4. **Team management** - Advanced collaboration features 5. **Monitoring & Analytics** - Built-in application monitoring ### How to Request Features Have an idea for a new feature? We’d love to hear from you: * **Discord**: Join our [Discord community](https://discord.gg/vvgQxVjC8G) and share your ideas * **Email**: Send us your suggestions at * **GitHub**: Open an issue in our [documentation repository](https://github.com/diploi/docs) ### Stay Updated To stay informed about new features and updates: * Follow us on [GitHub](https://github.com/diploi) * Join our [Discord community](https://discord.gg/vvgQxVjC8G) * Subscribe to our newsletter * Check our [blog](https://diploi.com/blog) for announcements ***
# The Diploi Way
> The philosophy behind Diploi - Own your Stack, Infrastructure as Code and Remote Development
Diploi is based on the three simple principles #### 1. Own your Stack **Keep as much of your project’s tech stack inside Diploi as possible so development matches production.** #### 2. Infrastructure as Code **Keep all your code in one place, structure your project as a monorepo. Keep the tech stack configuration as part of your project.** #### 3. Remote Development **Develop in the cloud, with zero local setup.**